How to work with mysql on the command line. Manual installation of MySQL on Windows. Connecting to the MySQL server in the console

 Live Journal
 Facebook
 Twitter
Popular database management system MySQL widely used for various needs, primarily as a de facto standard in the field of Internet hosting. No less widespread is the package for managing this DBMS - phpMyAdmin. Without a doubt, this is a good, convenient product, but very often it happens that the skills to work with this product completely replace the skills to work with the DBMS itself. Therefore, in this material we decided to introduce our readers to how to perform basic MySQL administration tasks from the command line.
As our regular readers may have noticed, we consistently oppose the use of various types of control panels by beginners, no matter how convenient and widespread they may be. At the same time, we do not deny their existence and we ourselves use them with pleasure in our daily activities.
But there is one big difference: a specialist who knows how to work with the command line using the panel does not replace the ability to work with the product, but only makes it easier for himself to perform everyday tasks. And a beginner, accustomed to performing all actions in the panel, if it is inaccessible, falls into a quiet panic, because now he needs to enter some “spells” into this incomprehensible black console...
In fact, working with a DBMS at the command line level is not at all difficult, and some administration tasks are easier and more convenient to perform in it. Let’s make a reservation right away: by administration we mean the administration of the DBMS server, and not the databases themselves. Of course, you can also work with them from the command line, but it is better to use more suitable tools for this.
Managing Databases and Users in MySQL
If you should start dancing from the stove, then working with a DBMS should begin with creating databases and users of these databases. The tasks are essentially simple and can be solved perfectly, and most importantly, simply, from the console. A utility of the same name is designed to work with the MySQL server mysql, which is worked with in interactive mode, so first we’ll connect to the server:
Mysql -u root -p
Where the -u switch specifies the username, and -p specifies password authentication, the command syntax allows you to specify the password by entering it without spaces immediately after the key, but in this case it will be saved in the command history, which is not entirely good, so it is better to enter the password interactively. After executing this command, we will find ourselves in the MySQL environment, as indicated by the changed command line prompt.
Working in this environment has its own characteristics: each command must end with the symbol ;
or \g, which, by the way, is written about in the first line of the greeting. This mode is exited with the command:
Let's talk about one very common mistake: forgetting to put a semicolon at the end of the command. What to do? No big deal, just fill in the missing characters in the next line.
First, let's look at the list of databases:
Show databases;
As they say, without unnecessary details, but for most administrative tasks this is enough:
 Finding out the list of users is a little more difficult; it is stored in the form of a service database table mysql, so we write a small request:
Select user,host from mysql.user;
Team select selects the specified columns user, host, the from option indicates where we select them from, namely from the user table of the database mysql.
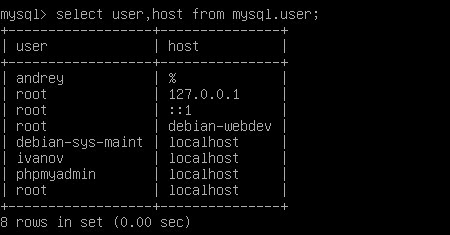 The first column indicates the user, the second - the host on which this user is allowed to connect, %
- denotes any value. Please note that if ivanov has in settings localhost, then when connected to mysql by the address 127.0.0.1
he will not be able to gain access, this must be taken into account when you specify connection data to the DBMS server in your applications.
The first column indicates the user, the second - the host on which this user is allowed to connect, %
- denotes any value. Please note that if ivanov has in settings localhost, then when connected to mysql by the address 127.0.0.1
he will not be able to gain access, this must be taken into account when you specify connection data to the DBMS server in your applications.
You can view database owners using the following query:
Select host,db,user from mysql.db;
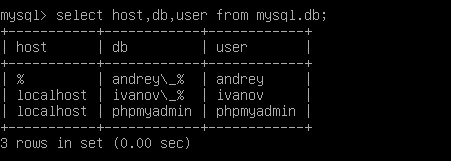 No special comments are required here. For example, ivanov has rights to databases with the prefix ivanov_ when connected via localhost, and andrey to bases with a prefix andrey_ on any host. You can view user privileges with the command:
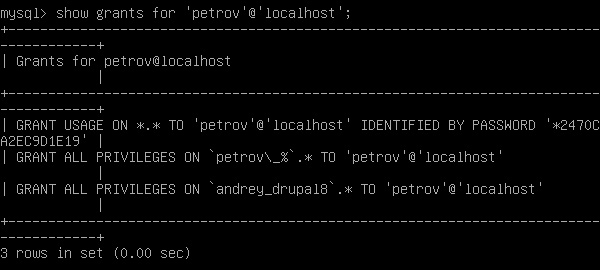
Show grants for "ivanov"@"localhost";
We wrap the username and host in single quotes.
 The first line reports that the specified user does not have privileges ( USAGE) to any table of any database ( *.*
), the second line talks about all the main privileges for all tables of all databases with the prefix ivanov_.
The first line reports that the specified user does not have privileges ( USAGE) to any table of any database ( *.*
), the second line talks about all the main privileges for all tables of all databases with the prefix ivanov_.
A detailed analysis of the MySQL rights system goes far beyond the scope of this article, let’s just say ALL PRIVELEGES gives the user all rights to his databases, but does not allow him to manage access rights for other users. To do this, a set of rights is used ALL PRIVELEGESWITH GRANT OPTION, which has by default root. For a simple user, this set of rights is redundant.
Let's try to create a new user:
Create user "petrov"@"localhost" identified by "password";
The command syntax is simple, we specify the username and host, as well as identification data in the form of a password. All passed values are wrapped in single quotes. Having created a user, you need to assign him rights, this is done with the command GRANT. First, we’ll explicitly deprive him of privileges to other people’s databases:
Grant usage on *.* to "petrov"@"localhost";
Then we can set rights at our discretion, for example, issuing full rights to databases with a name template petrov_:
Grant all privileges on `petrov\_%`.* to "petrov"@"localhost";
Please note that the pattern should be wrapped with characters gravis (` ), which are located on the key with the Russian letter E.
 You can grant rights to a separate database like this:
Grant all privileges on andrey_drupal8.* to "petrov"@"localhost";
To select rights, use the REVOKE command, which has a similar syntax, only to (to whom), replace it with from (who). For example:
Revoke all privileges on andrey_drupal8.* from "petrov"@"localhost";

In order for the MySQL server to apply the rights, you must force it to reload the privilege cache with the command:
Flush privileges;
You may also need to change the user password:
Set password for "petrov"@"localhost" = password("newpassword");
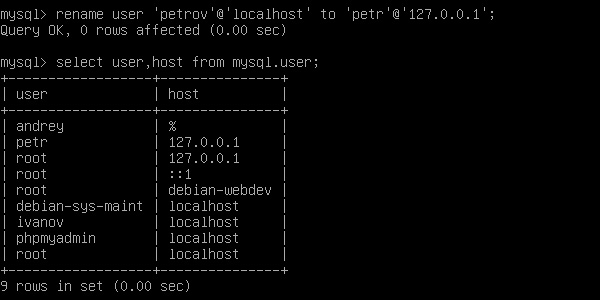
Rename it, and renaming does not necessarily mean changing the user name; you can change both the name and the host, in any combination:
Rename user "petrov"@"localhost" to "petr"@"127.0.0.1";
 And finally, delete the account:
Drop user "petr"@"127.0.0.1";
Let's move on from users to databases; in the simplest case, to create a new database, the command is enough:
Create database petrov_newdb;
This will create a database with the default code page and comparison encoding. If the DBMS server was not configured separately, then this encoding will most likely be latin1_swedish_ci, which in some cases can cause problems, if not now, then in the future, so it is a good rule of thumb to explicitly indicate the encoding when creating the database. For UTF-8 it would be like this:
Create database petrov_newdb default character set utf8 collate utf8_general_ci;
For Windows-1251:
Create database petrov_newdb default character set cp1251 collate cp1251_general_ci;
To remove the database use:
Drop database petrov_newdb;
Checking, optimizing, fixing errors in MySQL databases
As MySQL actively works, databases may become fragmented and may contain errors in table data. We are not talking now about serious failures; such situations should be considered individually, but about the simplest errors that can be successfully eliminated using the DBMS itself. To check, repair and optimize, it is convenient to use the mysqlcheck utility.
To check the database do where andrey_drupal8- database name:
Mysqlcheck -u root -p --check andrey_drupal8
All databases can be checked at once with the command:
Mysqlcheck -u root -p --check --all-databases
And since the entire output most likely will not fit on the screen, it makes sense to redirect it to the command less:
Mysqlcheck -u root -p --check --all-databases | less
note that less allows you to scroll the output both down and up using the arrows, press to exit q.
If errors were found in any of the databases, you should try to correct them, to do this, indicate:
Mysqlcheck -u root -p --auto-repair andrey_drupal8
To optimize, use the key - -optimize, you can optimize a single database or several, to do this, list them after the key --databases:
Mysqlcheck -u root -p --optimize --databases andrey_drupal8 petrov_newdb
and also all at once:
Mysqlcheck -u root -p --optimize --all-databases
Uploading and loading MySQL database dumps
Another common task when administering any DBMS, database dumps are used both for backup and for transferring or creating copies. If backup is an automated process, then creating copies for transfer to another server or before any significant interventions in the database structure must be done manually.
And if it comes to large databases, then here phpMyAdmin a bad helper, it affects the execution time of scripts, the size of the downloaded file, available memory, etc. And while you can still upload a large dump using it, you may not be able to upload it back.
Let's start by creating dumps; the utility is used for these purposes mysqldump, the syntax of which follows the syntax mysqlcheck. To download the dump, use the command:
Mysqldump -u root -p andrey_drupal8 > ~/drupal8.sql
To unload several databases at once, use the key --databases or --all-databases to create a dump of all databases at once. The output of the command should be sent to a file and indicate its location, in our case this is the file drupal8.sql in your home directory. You can also pipe the output to the archiver and receive the archive immediately:
Mysqldump -u root -p andrey_drupal8 | gzip > ~/drupal8.sql.gz
In general, we do not recommend using one dump for several databases at once; the best option would be its own dump for each database, at the same time using a key --all-databases justified in cases where you need to quickly make a backup copy of the entire server, for example, when updating or reinstalling a DBMS, so that you can quickly restore information if something goes wrong.
In order to restore the database, you need to send the dump to the input of the mysql utility; for single dumps, you should always specify the destination database, for example:
Mysql -u root -p andrey_drupal8< ~/drupal8.sql
The destination does not necessarily have to be the source database, but note that if the database already exists, all its contents will be replaced by the contents of the dump.
For dumps containing more than one database, simply specify:
Mysql -u root -p< ~/all.sql
In this case, each database will be loaded into its own source; if the source database does not exist, it will be created.
As you can see, creating and restoring dumps using the command line occurs literally in one line and is much easier and faster than using phpMyAdmin or similar tools.
Recovering a forgotten MySQL root password
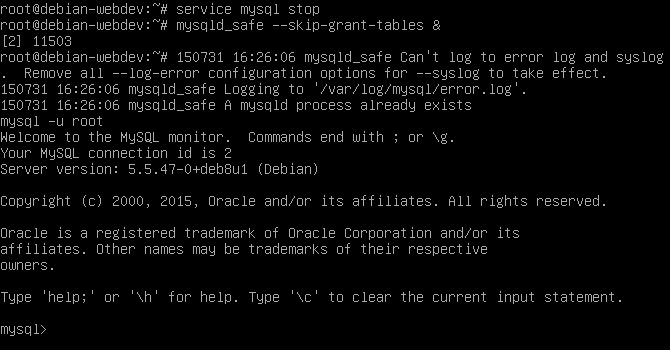
Another very popular task. Let's say right away that it is impossible to recover the MySQL superuser password, like any other user, but you can change it. To do this, you need to have superuser rights to the operating system. First, let's stop the DBMS service:
Service mysql stop
Then we run it in safe mode, skipping the privilege tables:
Mysqld_safe --skip-grant-tables &
Please note that after executing this command, the command line prompt will disappear, leaving only a blinking cursor. We write directly there:
Mysql -u root
and we find ourselves in the mysql environment with root rights without entering a password.
 It seems to us that many have already guessed what to do next, but set password it won’t work in this mode, so you need to go a different way. Remember that information about users is stored in a table user service database mysql. Then we run the following query:
Update mysql.user set password = password ("newpassword") where user="root";
Important! In new versions of MySQL, instead of a column password tables user column is used authentication_string, so instead set password should be indicated set authentication_string.
This request will set a new password newpassword for all rows in a column user which are listed root.
 Let's update the privilege cache:
Flush privileges;
Let's exit the mode:
Let's stop the service and start it in normal mode:
Service mysql stop
service mysql start
We hope that after reading this article you will acquire initial skills in working with MySQL from the command line and will be able to feel confident even when phpMyAdmin is not available, and maybe even appreciate the convenience of console commands and will be less likely to enter the panel, preferring to manage the server directly.
Below is a list of the most useful and frequently used commands MySQL with examples.
mysql at the beginning of the line means that the command is executed after logging in MySQL.
The # or $ symbol at the beginning of the line means that the command is executed from the command line.
To check the server status MYSQL do:
For FreeBSD:
# service mysql-server status
V CentOS/RHEL:
# service mysqld status
MySQL from the console if the server MySQL is on the same host:
To connect to the server MySQL from the console if the server MySQL is located on the remote host db1.example.com:
$ mysql -u username -p -h db1.example.com
Working with databases and tables - viewing, deleting, editing records. Console
Create a database on MySQL server:
Mysql create database
Show a list of all databases on the server MySQL:
mysql use ;
Display all tables in the database:
Mysql show tables;
View the table format in the database:
mysql describe ;
Delete database:
Mysql drop database ;
Delete a table from the database:
Mysql drop table ;
Show all table contents:
Mysql SELECT * FROM ;
Display columns and column contents in the selected table:
Mysql show columns from ;
Display rows in a specific table containing " whatever ":
Mysql SELECT * FROM WHERE = "whatever";
Display all records in a specific table containing "Bob" and the phone number "3444444:
Mysql SELECT * FROM WHERE name = "Bob" AND phone_number = "3444444";
Show all entries, NOT containing the name "Bob" and phone number "3444444", sorted by the phone_number field:
Mysql SELECT * FROM WHERE name != " Bob " AND phone_number = " 3444444 " order by phone_number;
Show all entries starting with the letters "bob" and the phone number "3444444" in a specific table:
Mysql SELECT * FROM WHERE name like "Bob %" AND phone_number = "3444444";
Show all entries starting with the letters "bob" and the phone number "3444444", limiting entries 1 to 5:
Mysql SELECT * FROM WHERE name like "Bob %" AND phone_number = "3444444" limit 1.5;
Using regular expressions ("REGEXP BINARY") to search for records. For example, for a case-insensitive search, find all records starting with the letter A:
Mysql SELECT * FROM WHERE rec RLIKE "^a";
Show all unique entries:
Mysql SELECT DISTINCT FROM ; mysql SELECT , FROM ORDER BY DESC;
Show the number of rows in the table:
Mysql SELECT COUNT(*) FROM ;
Mysql SELECT SUM(*) FROM ;
Removing a column:
Mysql alter table drop column ;
Adding a column to the database:
Mysql alter table add column varchar(20);
Changing the column name:
Mysql alter table change varchar(50);
Create a column with a unique name to avoid duplicate names:
Mysql alter table add unique();
Resizing a column:
Mysql alter table modify VARCHAR(3);
Removing a column from a table:
Mysql alter table drop index ;
Mysql LOAD DATA INFILE " /tmp/filename.csv " replace INTO TABLE FIELDS TERMINATED BY "," LINES TERMINATED BY "n" (field1,field2,field3);
MySQL server users, passwords - adding, changing users and passwords. Console
Creating a new user - connecting to the server MySQL as root, switch to database, add user, update privileges:
# mysql -u root -p mysql use mysql; mysql INSERT INTO user (Host,User,Password) VALUES("%"," username ", PASSWORD(" password ")); mysql flush privileges;
Changing the user password from the console on the remote host db1.example.org:
# mysqladmin -u username -h db1.example.org -p password " new-password "
Changing the user password from the console MySQL- connect as root, update password, update privileges:
# mysql -u root -p mysql SET PASSWORD FOR " user "@" hostname " = PASSWORD(" passwordhere "); mysql flush privileges;
Recovering/changing the root server password MySQL- stop MySQL, start without privilege tables, connect as root, set a new password, exit and restart MySQL.
# /etc/init.d/mysql stop # mysqld_safe -skip-grant-tables & # mysql -u root mysql use mysql; mysql update user set password=PASSWORD(" newrootpassword ") where User="root"; mysql ; flush privileges; mysql quit # /etc/init.d/mysql stop # /etc/init.d/mysql start
Set a root password if there is on root password.
# mysqladmin -u root password newpassword
Update root password:
# mysqladmin -u root -p oldpassword newpassword
Setting the right to connect to the server from the host localhost with the password "passwd" - connecting to subroot, switching to the database, setting privileges, updating privileges:
# mysql -u root -p mysql use mysql; mysql grant usage on *.* to bob @localhost identified by " passwd "; mysql flush privileges;
Setting user privileges to use the database - connecting as root, switching to the database, setting privileges, updating privileges:
# mysql -u root -p mysql use mysql; mysql INSERT INTO db (Host,Db,User,Select_priv,Insert_priv,Update_priv,Delete_priv,Create_priv,Drop_priv) VALUES ("%","databasename","username","Y","Y","Y"," Y","Y","N"); mysql flush privileges;
Mysql grant all privileges on databasename .* to username @localhost; mysql flush privileges;
Updating information in the database:
Mysql UPDATE SET Select_priv = "Y",Insert_priv = "Y",Update_priv = "Y" where = user";
Deleting a row in a table:
Mysql DELETE from where = "whatever";
Updating privileges in the database:
Mysql flush privileges;
Backups - creating, restoring databases. Console
Create a backup copy (dump) of all databases into the alldatabases.sql file:
# mysqldump -u root -p password -opt ; /tmp/alldatabases.sql
Back up one database to the databasename.sql file:
# mysql dump -u username -p password -databases databasename ; /tmp/databasename.sql
Back up one table to the file databasename.tablename.sql:
# mysql dump -c -u username -p password databasename tablename ; /tmp/databasename.tablename.sql
Restoring a database (or table) from a backup:
# mysql -u username -p password databasename< /tmp/databasename.sql
Creation of database tables. Console
column names are indicated in small letters;
CAPITAL letters - types and attributes of columns;
in (brackets) - the value of the column type.
Create a table, example 1:
mysql CREATE TABLE (firstname VARCHAR(20), middleinitial VARCHAR(3), lastname VARCHAR(35), suffix VARCHAR(3), officeid VARCHAR(10), userid VARCHAR(15), username VARCHAR(8), email VARCHAR(35 ), phone VARCHAR(25), groups VARCHAR(15), datestamp DATE, timestamp TIME, pgpemail VARCHAR(255));Create a table, example 2:
Mysql create table (personid INT(50) NOT NULL AUTO_INTCREMENT PRIMARY KEY, firstname VARCHAR(35), middlename VARCHAR(50), lastname VARCHAR(50) default "bato");
Good day, colleagues :)
Yes, exactly colleagues, because for a mere mortal, the MySQL command line (or MySQL Shell, as developers also like to call it), as well as working with MySQL in the console, is unlikely to be useful.
In order for this topic to be interesting, you need to be, at a minimum, a novice system administrator who does not use phpMyAdmin and other interfaces in principle.
Personally, I myself prefer to use phpMyAdmin as the main one for working with MySQL, because... I am a visual person by nature. However, sometimes in practice there are situations when knowledge of the MySQL command line and the ability to work with MySQL in the server console are simply necessary.
I currently have three of them:
- The first time I encountered working in the MySQL console was when I needed to import a large database dump. It was not loaded entirely through phpMyAdmin, because... fell off somewhere in the middle due to timeout, despite changing the settings for the operation execution time and the size of the downloaded files. In principle, it was possible to select the necessary values, but it seemed to me to be a too long process.
- The next time I had to work with MySQL via the command line was to disable the check of foreign keys, when I needed to delete data from a table that was linked to others using keys. I just couldn't find how to do this in phpMyAdmin.
- Serious companies use only the console to work with MySQL without any phpMyAdmins. I don’t know why exactly, but knowledgeable people said that it had something to do with security. As a result, everyone had to work with the MySQL command line, including me :)
But, again, working with MySQL in the console and command line is quite suitable for everyday use. All known visual programs for working with databases still work based on MySQL console commands. Therefore, as you like :)
Running the console on different OS
Since I will be demonstrating how to use the MySQL command line in the server console, it would be a good idea to start with it first.
The action is simple, familiar to many, for which knowledge of the “hot keys” is enough.
Launching the console on Windows:
- Win+R to open Windows command prompt with administrator rights;
- Enter the command cmd
- Click Enter on keyboard
Launching the console in Linux distributions (terminal): in Ubuntu, which I worked with, the system key combination is enough Ctrl+Alt+T. I can’t say anything about other Linux-based operating systems.
Launching the console on MacOS: I haven’t done this myself, because... I haven’t gotten a Mac yet and I’m unlikely to get one because I don’t need it, but as far as I was able to find out, there are no “hot keys” for calling a terminal in this OS. So if you are a user of Apple products, then launch the console through the OS interface, fortunately there are many manuals on the Internet.
It’s a little embarrassing to even publish such information in case some professional system administrator with extensive experience accidentally stumbles upon this article, because he will think: “The author considers his readers to be programmers, but at the same time he teaches how to launch a console... Some kind of psycho :-).”
Yes, quite logical :) But I’m just taking into account the situation that, along with professional developers, beginners can also get here. That’s why I try to make the information complete and accessible to all categories of users, as I already mentioned.
Basic MySQL Console Commands
So, first of all, we need to access the MySQL command line in the console. To do this, open the server console and, if you have MySQL installed globally as a service, then to “check the connection” we write the following:
Mysql -V
Console command mysql allows us to launch the utility of the same name, which is a MySQL command line.
This will allow us to find out the version of MySQL installed on the computer and make sure that it is installed as a service at all. If this is the case, then you will see something like the following text in the console: .
Yes, I’m not a “crazy coder”, because I’m using Windows :) But that’s not the point. On Unix systems the procedure will be the same.
If suddenly MySQL is not installed globally on your computer or you need to work with several versions of MySQL, in which there are only directories with MySQL files and libraries, then launching MySQL through the console will look like this.
In the console, go to the directory where the MySQL executable file is located (on Windows, at least it’s mysql.exe) with the following command:
Cd C:\OpenServer\modules\database\MySQL-5.7-x64\bin
Naturally, your path to the distribution may be different. As an example, I decided to run one of the versions of MySQL included with OpenServer.
And we launch MySQL, checking its version along the way:
Mysql.exe -V
As a result, a message similar to the first case should have been displayed in the console mysql Ver 14.14 Distrib 5.7.16, for Win64 (x86_64).
That’s it, we’ve sorted out launching MySQL from the command line through the server console, now we’ll connect directly to the MySQL server.
Connecting to the MySQL server in the console
The MySQL server may not necessarily be on the same machine on which you are trying to access it in the console. Therefore, in order to make connecting to a remote MySQL server via the console possible, the mysql utility has many parameters with which you can specify the necessary settings.
In order to launch the MySQL command line in the console, we just need to write the following in the server console:
However, in this case you will receive the following error: ERROR 1045 (28000): Access denied for user ‘ODBC’@’localhost’ (using password: NO). This is how the error message looks on my Windows. If you use Linux, then instead of ODBC there will be the name of your system user under which you perform actions in the system.
All this is because by default, when connecting to a MySQL server, the console uses the ODBC user on Windows without a password and the system user on Linux with the same password. The default host is localhost, i.e. This user can only connect from the local machine.
Therefore, you have two options: either use another user to log into the MySQL command line, or create a MySQL user with the required account. But for the second method we still can’t do without the first :) Therefore, first we connect to the MySQL server under a standard user root, which is created when installing MySQL on a computer and for which access from localhost is allowed by default:
Mysql -u root -p
When prompted to enter a password, simply press Enter (if you did not enter it, of course, when installing MySQL). You will then be connected to the MySQL server, assigned a connection ID and given access to the MySQL command line.
If you want to connect to a MySQL server that has a specific hostname or IP or want to log in as a different user, then use the following command format:
Mysql -u user_name -p user_password -h MySQL_server_host_or_IP
Instead of Cyrillic characters with underscore, of course, you need to enter your data in Latin characters. By the way, if you wish, you can write this command in a slightly different format:
Mysql --user=user_name --password=user_password --host=host_or_IP_of_MySQL_server
If for some reason you don't want your MySQL connection password to appear in the console (which is correct, actually), you can use the following command:
Mysql -u user_name -h MySQL_server_host_or_IP -p
Since the password is not explicitly specified, you will be prompted to enter it in the next step. Moreover, the characters you enter will not be displayed even in the form of asterisks (wildcards), instead there will be just an empty line.
In addition to the specified connection settings, it is possible to use the following parameters, the values of which will be specified in a manner similar to those listed above:
- --port or -P - to specify the port for connecting to the MySQL server;
- —protocol — the protocol through which the connection will be made (possible options: TCP for Windows and Linux, SOCKET for Linux, PIPE and MEMORY for Windows);
- --socket or -S - this parameter is useful if you want to connect via sockets, therefore, the value of the parameter will be socket;
- --pipe or -W - the parameter is needed if you want to use named “pipelines” or “pipes” for connections;
- --shared-memory-base-name - this parameter will be useful for MEMORY connections via shared memory on Windows;
It is clear that the list of all parameters for connecting to the MySQL server is not limited to this. In reality there are many more of them.
If for some reason the standard option indicating the host, user and password does not suit you, then to find out the full list of connection parameters the following information will be useful to you - https://dev.mysql.com/doc/refman/5.7/en/ connecting.html
How to create a database in MySQL console
After we have connected to the MySQL server and launched the MySQL command line, it is time to begin the life cycle of our site database, which starts with its creation. To create a MySQL database through the command line, you need to enter the following command:
CREATE DATABASE database_name;
The same action can be done using a special MySQL utility mysqladmin. It runs in isolation from the MySQL command line, i.e. To use it, you will need to exit it or open a new server console.
And then call the following command:
mysqladmin create database_name;By the way, using the mysqladmin utility you can not only create and delete databases without logging into the MySQL console, but also operate the server configuration, MySQL processes, manage replications, ping servers and do many other interesting things.
How to create a MySQL user on the command line
Not often, but sometimes you need to create a new MySQL user. Moreover, in console mode.
On the MySQL command line this is done as follows:
CREATE USER "user_name"@"host_or_machine_IP" IDENTIFIED BY "user_password";
The user has been created. Parameter host_or_IP_machine means that when creating a user, you need to specify the IP from which he can connect to the server, or the host name (the domain name of the working machine on the network is suitable).
By the way, when specifying the host to connect to the MySQL server, you can use the percent symbol - % , which means that the created user can connect to the MySQL server from any IP address or host.
It should be taken into account that in this case localhost is not included in the list of addresses specified using %, because localhost denotes a connection via a UNIX socket instead of the standard TCP/IP. Those. If the created MySQL user will connect to the server not using sockets, but using a different protocol specified when connecting to the MySQL server in the console, then he will need to create two user accounts:
CREATE USER "username"@"%" IDENTIFIED BY "password"; CREATE USER "username"@"localhost" IDENTIFIED BY "password";
We've figured out how to create a MySQL user in the console. Now let's set the user rights to perform any actions with our newly created database with the following command:
GRANT ALL PRIVILEGES ON database_name.* TO "user_name"@"host_or_machine_IP";
Option ALL, as you understand, just indicates that the user is allowed any actions with a specific database. Complete list of rights that can be granted to users using the command GRANT, can be found here (though the description of the parameters is in English) - https://dev.mysql.com/doc/refman/5.7/en/grant.html#grant-privileges
By the way, you can use several privilege parameters, specifying them when calling the command, separated by commas.
If you want to create a superuser, i.e. has global privileges to perform various actions with all databases on the server, then use the following command call:
GRANT ALL ON *.* TO "user_name"@"host_or_machine_IP";
By the way, it would be a good idea to clear the MySQL server cache after setting privileges. If you change them, then also do not forget to do this by calling the following command:
FLUSH PRIVILEGES;
And if you want to change user rights, first use the following command to reset all rights:
REVOKE ALL PRIVILEGES ON *.* FROM "user_name"@"host_or_machine_IP";
And then install the ones he needs using GRANT, as described earlier.
If in the future you need to change the MySQL user password, then to do this, just run the following commands in MySQL Shell:
SET PASSWORD FOR "user_name"@"host_or_machine_IP" = PASSWORD("new_password"); FLUSH PRIVILEGES;
Resetting the MySQL server privilege cache is needed for the same purpose as when changing rights - without this action, changing the MySQL user password may not be counted, so don’t be lazy to use it :)
By the way, the Internet is full of examples of using the following command to reset a user’s MySQL password:
UPDATE mysql.user SET Password=PASSWORD("password") WHERE User="username";
But this option did not work for me on MySQL 5.7, giving an error ERROR 1054 (42S22): Unknown column ‘Password’ in ‘field list’. The reason turned out to be the absence of the Password field in the mysql.user table.
From which we can assume that this option only works for older versions of MySQL, where this field existed in the user table. Therefore, to be sure, use my first option, unless, of course, you are forced to work with antediluvian software without the ability to update versions :)
This completes the creation of a new MySQL user and review of actions with its rights and passwords. Let's move on.
Selecting a database when working with MySQL via the command line
Now, after creating a user in MySQL Shell and assigning him rights to work with the database, we need to select this very database so that we can operate with the database itself and the data stored in it.
To do this, use the following command in the MySQL console:
USE database_name;
If everything went well, a message will be displayed in the console Database changed, which will signal that we have logged into the MySQL database via the console. By the way, when connecting to a MySQL server, you can initially specify the database with which you will need to work. To do this, you need to enter the following command in the server console:
Mysql --user=user_name --password=user_password --host=MySQL_server_host_or_IP --database=database_name
Or the same thing, only asking for the MySQL user password:
mysql -u user_name -h host_or_IP_MySQL_server_database_name -pThat's all. I think you won’t have any difficulties connecting to the MySQL database via the console now :)
Working with MySQL tables via the MySQL console
So, we created a MySQL database through the console. Now it would be nice to learn how to work with it for the case when the MySQL command line will be the only means of accessing the data stored on the server (as was the case for me, which I talked about at the beginning of the article).
As you know, it consists of tables, inside of which information is already stored in the form of records with several fields. Therefore, following the hierarchy of information placement, first we will learn how to perform typical CRUD operations with tables.
CRUD operations, if someone is not in the know, are operations for creating, reading, updating and deleting data from English. “Create, Read, Update, Delete” (you may need this during interviews).
Let me remind you that to perform actions with tables you must first connect to the MySQL database using the command USE.
So, the first thing on our agenda is the command to create a MySQL table in the database via the command line, which looks like this:
CREATE TABLE table_name (field_name_1 field_type_1, field_name_2 field_type_2(field_size_2), INDEX(field_name_1), ...);
As you understand, there can be as many fields as you like, their types can be different, as well as the presence of indexes and keys are optional.
By the way, if you want to copy a table to another database or simply create a copy in the current one, the following commands will help you:
CREATE TABLE new_table_name LIKE old_table_name; INSERT new_table_name SELECT * FROM old_table_name;
These commands allow you to copy the table structure and its data along with table indexes and triggers. If you just need data and structure (names of fields and their data types), then you can get by with calling one command:
CREATE TABLE new_table_name AS SELECT * FROM old_table_name;
The next operation from the CRUD block is reading. In the case of tables, reading will be displaying their structure. To do this, there are the following four commands:
SHOW FULL COLUMNS FROM table_name; DESCRIBE table_name; EXPLAIN table_name; SHOW CREATE TABLE table_name;
The first displays information about the fields of the database table in tabular form to the MySQL console, indicating the field name, data type, presence of keys, default value, etc. When using a keyword FULL you can get extended information, including privileges for each field for the current user, comments for each of them, and the encoding value.
The second and third commands are simply shortened forms of the first command without the extended information. Why was there a need to create more of them? I can’t even imagine... Is it so that there would be something to ask during job interviews? 🙂
The fourth command, in addition to the name, field types and their default values, allows you to get the values of table keys, table engines (InnoDB, MyISAM), encoding, etc.
Update operation in the case of tables represents a change in their structure, i.e. various actions with MySQL table fields:
ALTER TABLE table_name DROP COLUMN field_name; ALTER TABLE table_name ADD COLUMN field_name VARCHAR(20); ALTER TABLE table_name CHANGE old_field_name new_field_name VARCHAR(50); ALTER TABLE table_name MODIFY field_name VARCHAR(3);
The first command allows you to delete a specific table field, the second allows you to add it, the third allows you to rename a field and simultaneously change the type of data stored in it, and the fourth allows you to change only the data type.
The same can be done with table indexes using largely similar commands:
ALTER TABLE table_name ADD UNIQUE INDEX index_name (field_name_1, ...); ALTER TABLE table_name rename INDEX old index_name TO new index_name; ALTER TABLE table_name DROP INDEX index_name;
The following commands allow you to add, rename and remove indexes from MySQL tables via the command line. To add and remove indexes, by the way, there is another alternative option for using independent commands, rather than doing it through ALTER TABLE. Therefore, if you wish, you can use them:
CREATE UNIQUE INDEX index_name (field_name_1, ...) ON table_name; DROP INDEX index_name ON table_name;
The given commands are equivalent to the first and last from the previous block. Unfortunately, there is no separate command to rename an index. And to change the index type, unfortunately, there is no way at all in MySQL. The only solution is to delete the index and create it again with the desired type.
Well, finally, we have reached the last operation from the CRUD block - deletion. Removing MySQL tables from a database is very easy. Just run the following command in the MySQL console:
DROP TABLE table_name;
Sometimes in practice situations arise that make it impossible to delete a table or change its structure. As a rule, this is due to the use of foreign keys in the database to link tables with each other. I personally encountered this situation more than once, as I spoke about at the beginning of the article.
Therefore, if, when deleting or updating a table structure or its data, MySQL returned you an error with the text Cannot delete or update a parent row: a foreign key constraint fails, then the following information will come in handy for you.
In order to implement our plan, we need to temporarily disable the check for the existence of foreign keys, perform the necessary operation, and then enable the check again, because it is really necessary and allows you to protect against data integrity violations in most cases.
As a matter of fact, MySQL foreign keys are needed for this purpose.
So, to delete data that is interfered with by foreign keys, you need to perform the following steps in the MySQL console:
SET FOREIGN_KEY_CHECKS=0; #required_mysql_command SET FOREIGN_KEY_CHECKS=1;By the way, if you want to delete a foreign key, the procedure will be the same as when deleting an index:
ALTER TABLE table_name DROP FOREIGN KEY foreign_key_name;
To find out the name of the MySQL foreign key of a table, use the already familiar MySQL console command SHOW CREATE TABLE.
Working with MySQL table data via the command line
For CRUD tables, we looked at operations in the MySQL console. For a complete picture, this cheat sheet only lacks commands for working with the data itself stored in database tables. I think many people know these commands and have used them in practice, but I’ll still remind you of them again.
CRUD operations for working with MySQL table data will look like this:
INSERT INTO table_name (field1, field2, ...) VALUES (field_1 value, field_2 value, ...); SELECT field1, field2, ... FROM table_name; UPDATE table_name SET field1 = field_1 value, field2 = field_2 value; DELETE FROM table_name WHERE field1 = field_1 value;
The above commands correspond to the operations of creating, reading, updating and deleting data from MySQL database tables. When using SELECT and UPDATE, it is also possible to use a qualifying WHERE clause, which can be used to specify the data selection in the same way as described when using DELETE.
Also, when retrieving data from a database using SELECT, you can use the following option to obtain the values of all table fields:
SELECT * FROM table_name;
Naturally, these operations can use other operators besides WHERE. There are especially many of them when retrieving data using SELECT: here there is UNION for combining the results of several queries, and various types of JOIN. Listing everything is very long and it will be tedious for both me and you to read this.
Therefore, let's agree: if you want to know more about something, just write about it in the comments, and I will try to answer you. Or other knowledgeable members of our community will do it. OK? 😉
So we won’t dwell on this block for now.
If you need to delete all data from a table, you can use the following MySQL command:
TRUNCATE table_name;
Before calling it, as mentioned earlier, you may need to disable foreign key checking in case there are related MySQL tables, which may prevent the required action from being performed.
Another interesting point to note here is that this command does not reset the AUTO_INCREMENT counter, which is known to be used to automatically generate a field value without the need to manually set it.
Fields of this type are most often used to generate values for the main key field id, which is used to establish relationships between data from different tables.
That is, if before deleting table data using TRUNCATE the maximum counter value was 1200, then the first record after this procedure will have an identifier value of 1201. In principle, it’s okay. If you have set a sufficient size for this field, then you will not be in danger of overflowing the values soon.
However, in some cases, when the application code has some kind of binding to the value of a field, this behavior can cause inconvenience.
To avoid this, use this option instead of the command above:
TRUNCATE TABLE someTable RESTART IDENTITY;
This command call option TRUNCATE will allow you to reset the field counter value from AUTO_INCREMENT. Therefore, the field value of the first added record after this deletion will be 1 instead of 1201, as in the example above.
How to delete a MySQL database via command line
The life cycle of working with a database is coming to an end and ends quite logically - by deleting it. In order to perform this operation in the MySQL console, you need to run the following command (in this case, the database to be deleted may not be selected by the command USE):
DELETE DATABASE database_name;
The same action can be done using the MySQL mysqladmin utility, which I already mentioned at the beginning of the article when creating a database:
Mysqladmin drop database_name;
When you call the command, the following message appears in the server console:
Dropping the database is potentially a very bad thing to do.
Any data stored in the database will be destroyed.
Do you really want to drop the ‘database_name’ database
In short, this is a warning that deleting a MySQL database is a very bad idea. Confirmation of the action is also requested. If you agree, write y and press Enter on the keyboard, after which the following message will be displayed on the screen (if everything went well, of course):
Database "database_name" dropped
That's it :)
How to delete a MySQL user in the console
Now the same fate will befall the MySQL user we created to show you how it's done. But first, it would be a good idea to check whether the required user actually exists before deleting it.
As of MySQL 5.7, there is one command for both of these actions:
DROP USER IF EXISTS username;
Earlier versions of MySQL required two separate commands:
GRANT USAGE ON *.* TO "user_name"@"host_or_IP_address"; DROP USER "user_name"@"host_or_IP_address";
Unfortunately, in this case, the message about the execution of the operation in the MySQL console is traditionally uninformative 🙁 Therefore, to find out that the MySQL user user has been deleted, you can use the following command, which displays a list of all users existing on the current MySQL server:
SELECT User FROM mysql.user;
This command option will only display usernames. If you need to see the hosts from which users can connect to the server, and the list of privileges, you can call the command in the following form:
SELECT User, Host, Grant_priv FROM mysql.user;
Also in the mysql.user table there are a lot of other fields that store other types of privileges and other information, a full list of which can be found here - https://mariadb.com/kb/en/library/mysqluser-table/
Don't be confused that this is documentation for the MariaDB DBMS. Technically this is the same as MySQL, because... MariaDB is just its branch or fork from the English “fork” - branch, fork.
Why was it done - again, I have no idea 🙂 Perhaps to proudly declare to everyone that “I have my own DBMS”?.. But, to be honest, I’m not very aware of the exact motives and differences between MySQL and MariaDB. Therefore, if you know something about this, it would be interesting to read about it in the comments.
Exiting MySQL Console
That's all, the life cycle of the database and the user, which began with their creation and ended with their deletion, has come to an end. Therefore, the MySQL command line, which we worked with in the server console using the utility mysql, we don't need it anymore.
All that remains is to get out of it...
It would seem that the action is trivial, but many in a situation where they need to exit the MySQL command line simply close the server console and open it again. You can, of course, act like this, but it takes up extra seconds of working time and makes you irritated every time you need to do it.
The correct behavior in this situation is just to call the command exit in the MySQL command line, after which the service will politely say goodbye to us :)
And that’s all 🙂 So next time you don’t need to create multiple consoles and re-open them every time you need to exit MySQL in the console and access it again to manage the server.
That's all I wanted to tell you today. I hope that my cheat sheet for working with the MySQL command line via the console will be useful not only to me, but also to you.
Speaking about the practical application of the information presented in the article, I would like to remind you that the above constructs can be used not only in the MySQL command line and the server console, but also in the console of phpMyAdmin and other software that provides such an opportunity.
Whether you use it or not is your business. But, as I said at the very beginning of the article, there are situations when using the MySQL console can save you time and stress. Whether to use the command line every day or not is purely a matter of taste and individual preference.
Write in the comments about which commands you use most often. Or perhaps you know some other tricks. In any case, share your opinion with others and keep the conversation going in the comments of other users.
I promise that in the process you will learn a lot of new things, just like I do when writing each of my articles :)
That's all! Good luck and see you again :)
P.S.: if you need a website or need to make changes to an existing one, but there is no time or desire for this, I can offer my services.
More than 5 years of experience professional website development. Work with PHP, OpenCart, WordPress, Laravel, Yii, MySQL, PostgreSQL, JavaScript, React, Angular and other web development technologies.
It is possible not only through PHP. MySQL comes with a console client for connecting to a MySQL server. Console - this means that the program does not have a window interface, but only a command line interface in which databases are accessed using SQL queries.
The commands for connecting to MySQL on the command line, and even more so the SQL queries themselves, are identical for . In the following, for the sake of brevity, I will write “MySQL”, but throughout I mean “MySQL or MariaDB”, since in this case there is no difference between them.
By connecting via the command line to the MySQL DBMS, you can perform a variety of tasks: view databases and their tables, send queries to databases and receive the results of executing these queries.
To connect to the MySQL server, use a client program command called mysql.exe. It needs to be launched, but it must be done not by double-clicking, like a regular program, but from the command line.
Let's start by pressing the keyboard shortcut Win+r and let's do it
A command prompt will open.
Now we need to go to the folder with the file mysql.exe. This folder bin in the directory where your MySQL DBMS is installed. For example, I have MariaDB, which is installed in the folder C:\Server\bin\mariadb\. Therefore, the file we are interested in is located in the directory C:\Server\bin\mariadb\bin\. To go to this directory use the command CD in the following way:
Cd C:\Server\bin\mariadb\bin\
In this command, replace C:\Server\bin\mariadb\bin\ with the correct path for your system
Now let's run the mysql.exe file. It is not necessary to specify the file extension.exe - the system itself will guess what we mean. We also need to use the option -u And -p. After the first option you need to specify the username - root. After the second option is the password for the user. In my case, the password is not set, so I run without the option -p:
Mysql -u root
It may seem like not much has changed, but the new command prompt
MariaDB [(none)]>
indicates that we are connected to the MySQL server. More precisely, in my case we are connected to the MariaDB server.
To view the list of databases, enter the command:
SHOW DATABASES;

To send subsequent queries to a specific database (for example, test), use the command USE:
USE test;
To view the tables in the selected database, run the command:
SHOW TABLES;

Let's create some table:
CREATE TABLE AuthorsTBL (AuthorID INT NOT NULL AUTO_INCREMENT, AuthorName VARCHAR(100), PRIMARY KEY(AuthorID));
Let's look again at the contents of the test database.
Installation and administration of MySQL server.
Installation and first launch of MySQL.
Installation.
Installing MySQL is quite simple. First you need to download and unpack the sources (I don’t think it’s worth writing how to do this). You can find them on the MySQL website in the section - for every taste and for any OS, since MySQL works on almost all platforms.
If you are working on a Unix platform (in particular, I will give examples for Linux, which are slightly different for other Unix platforms), you need to follow these steps:
| shell> gunzip mysql-VERSION-OS.tar.gz | tar xvf - shell> ln -s mysql-VERSION-OS mysql shell> cd mysql shell> scripts/mysql_install_db shell> bin/safe_mysqld & |
You need to unpack the sources into the /usr/local directory, since this directory is specified in the configuration scripts, and create a symlink for the mysql directory - this is done because this directory is specified in the same scripts. You need to edit the mysql_install_db and safe_mysqld scripts in relation to your system, in order for them to start working, in particular, correct the path to indicate the location of mysqld and databases. To start the mysqld daemon, you need to go to the /usr/local/mysql/bin directory and run the safe_mysql script in the background. If you do not receive any messages, this is already good, it means everything went well. If an error message appears, it means that - there is something wrong with scripts. You can configure the mysql server to start when the computer boots. To do this, you need to place the safe_mysql start in one of the system initialization files (they differ depending on the version of Linux). For Linux Slakware, you need to add the following to the /etc/rc.d/rc.local file:
/usr/local/mysql/bin/safe_mysqld &
As for Windows, of which I am a fan, the installation is almost hassle-free. You unpack the zip archive, run the exe file, and then everything works on its own. It is usually installed in the c: mysql directory. On Windows NT, MySQL is installed as a service and you can specify the startup method - manual or automatic (Start-Settings-Control Panel-Services-MySQL-Startup).
Launch MySQL.
Server management is usually carried out from the command line. I already wrote about Linux, and on Windows 95/98, open a DOS session and run the following commands:
| cd mysqlbin mysqlbin>mysqld --standalone |
This command will start the mysql daemon in the background. Windows 95/98 does not allow running mysqld as a service. The absence of messages is a good sign, it means everything is in order.
When starting mysqld, you can specify the following options:
| -?, --help | Reference |
| -b, --basedir= | Path to the directory where mysql is installed |
| -h, --datadir | Path to the directory where the databases are stored. |
| -l, --log= | Transaction log name |
| -L, --language= | Default language (usually English). |
| -P, --port= | Connection port. |
| --skip-grant-tables | Ignore privilege tables. This gives anyone FULL access to all tables. Regular users should not be given permissions to run mysqld. |
| --skip-name-resolve | Allows you to grant access only to those hosts whose IP addresses are specified in the privilege tables. Used for a higher level of protection. |
| --skip-networking | Use connections only through the localhost interface. |
| -V, --version | Display version information. |
Now you can try to log into the server. To do this, use the mysql command. Initially, there is a single user who is granted login rights - root, which does not have a password. The first thing to do is log in as root and set a password for it. The mysql command can use the following options:
Note. The mysqld and mysql commands have some other options, but they are not of particular interest at the moment.
After setting the root password, you need to reboot the server with the mysqladmin reload command for the changes to take effect. After that, you can try logging in again:
| mysqlbinmysql -u root -p mysql Enter password:******* |
Privilege system and security in MySQL.
mysql database and privilege tables.
So, you have successfully logged into the mysql database, which is used to administer the server. What is there? And there are 5 tables here, which are no different from other database tables, except that these tables are used to provide access to the databases data and tables in them to users. Let's consider each of them.
Enter the following command which will show the tables in the mysql database:
mysql>show tables;
|
Let's briefly look at the functions of each table:
- User
Determines whether the user attempting to connect to the server is allowed to do so. Contains the username, password, and privileges. If you enter the command show columns from user;, then we get the following:Field Type Null Key Default Extra Host char(60) PRI User char(16) PRI Password char(8) Select_priv char(1) N Insert_priv char(1) N Update_priv char(1) N Delete_priv char(1) N Create_priv char(1) N Drop_priv char(1) N Reload_priv char(1) N Shutdown_priv char(1) N Process_priv char(1) N File_priv char(1) N Initially, this table contains the root user with the password you set and the host name "%". By default, root can log in from any host, has full privileges and access to all databases. The table also contains an entry for the user "%", which It should be removed immediately, as it allows access to any user.
delete from user where user="%"; To add a new user, follow these steps:
insert into user (host,user,password) values ("%.domain.com","john",password("df456"); insert into user (host,user,password) values ("localhost,"mary", password("kitchen"); select host,user,password from user; Host User Password % root 456g879k34df9 %.domain.com john 657t234d980hg6 localhost mary 234d76gh88rt9 Explanations:
1. The insert command inserts data into the table, do not forget to end the commands with ";".
2.When entering a password, use the password() function, otherwise the password will not work!
3. All passwords are encrypted by mysql, so you see abracadars in the Password field. This is done for security purposes.
4. It is not a good practice to assign privileges to users in the user table, since in this case they are global and apply to all databases. Grant privileges to each user to a specific database in the db table, which will be discussed later.
5.When specifying a host name for logging in via the network, it is recommended to explicitly specify the full host name, and not "%". In the above example, the user john is allowed to log into the server from all machines in the domain.com domain. You can also specify machine IP addresses and masks subnets for greater security.
Determines which databases can be accessed by which users and from which hosts. In this table, you can grant each user access to the databases and assign privileges. If you run the command show columns from db; we get the following:Field Type Null Default Extra Host char(60) PRI Db char(32) PRI User char(16) PRI Select_priv char(1) N Insert_priv char(1) N Update_priv char(1) N Delete_priv char(1) N Create_priv char(1) N Drop_priv char(1) N By default, all privileges are set to "N". For example, let's give the user john access to the library database and give him select, insert and update privileges (a description of the main mysql commands will be given in a separate section, now my goal is to show how tables work privileges).
insert into db (host,user,db,select_priv,insert_priv,update_priv) values ("%.domain.com","john","library","Y","Y","Y"); Privileges set in the db table apply only to the library database. If you set these privileges in the user table, then they will apply to other databases, even if access to them is not explicitly set.
- Host
The host table is used to expand the range of access in the db table. For example, if access to any database is to be provided to more than one host, then the host column in the db table should be left blank, and the required host names should be filled in the host table. Let's execute the command show columns from host;
Field Type Null Key Default Extra Host char(60) PRI Db char(32) PRI Select_priv char(1) N Insert_priv char(1) N Update_priv char(1) N Delete_priv char(1) N Create_priv char(1) N Drop_priv char(1) N
As can be seen from the table, here you can also set privileges for accessing the database. They are usually rarely used unnecessarily. All access privileges need to be set in the db table for each user, and in the host table only list the host names. The server reads all tables, checks username, password, host name, database name, privileges. If in the db table the select, insert privileges are set to “Y”, and in the host table to “N”, then in the end the user will still receive “Y”. To create confusion, it is better to assign privileges in the db table.
These 3 tables are the main ones. In new versions of MySQL, starting from 3.22, 2 more tables have been added - tables_priv and columns_priv, which allow you to set access rights to a specific table in the database and even to a specific column. They work like the db table, only they refer to tables and speakers. Also, starting with version 3.22, you can use the GRANT command to provide access to databases, tables, and table columns, eliminating the need to manually modify the db, tables_priv, and columns_priv tables. The GRANT command will be discussed in detail in the following sections.
Privileges granted by MySQL.
| Privilege | Column | Where is it used? |
| select | Select_priv | tables |
| insert | Insert_priv | tables |
| update | Update_priv | tables |
| delete | Delete_priv | tables |
| index | Index_priv | tables |
| alter | Alter_priv | tables |
| create | Create_priv | DB, tables, indexes |
| drop | Drop_priv | DB or tables |
| grant | Grant_priv | DB or tables |
| references | References_priv | DB or tables |
| reload | Reload_priv | server administration |
| shutdown | Shutdown_priv | server administration |
| process | Process_priv | server administration |
| file | File_priv | access to files on the server |
Select-used to retrieve information from tables. Select can also be used without permission to access any database, for example, as a calculator.
Insert-used to insert information into a table. For example:
Delete-used to remove information from tables.
Create-allows you to create databases and tables in them. Examples:
| mysql>mysqladmin -u john -ptest create mydb //Creates an empty database. mysql>use mydb; Database changed. create table monitoring (id int(5) not null auto_increment, first_name varchar(15) not null, last_name varchar(20) not null, address varchar(80) not null, primary key (id), key(last_name)); |
Drop-used to delete tables and databases.
Grant-allows a user to grant other users privileges that he himself has. Two users with different privileges and GRANT privileges can combine their permissions.
Index-allows the user to create and delete indexes.
File-a user with this right can execute LOAD DATA INFILE and SELECT...INTO OUTFILE commands and can read and write any file on the MySQL server.
The last 3 privileges are used to administer the server from the command mysqladmin.
MySQL special users.
There are 3 special users in MySQL: monty,admin and dummy.
- monty
Superuser. Can log into the server from either the local host or any host on the network. Has access to all databases and all privileges, but if root can log in for the first time without a password, monty must use a password and must be added to the tables privileges manually.
It should be noted that you must enter data for both localhost and “%”, that is, any host on the network.
- admin
A user who can log into the server from localhost without a password and who is assigned administrative privileges Reload and Process.admin user can use commands mysqladmin reload, mysqladmin refresh and mysqladmin flush-*,and mysqladmin processlist.
The admin does not have access to databases. Privileges to access certain databases must be assigned individually, either in the db table, or with the GRANT command.
- dummy
A user who can log into the server without a password, but only from the local host. All global privileges are set to "N" except "USAGE", which allows dummy to create users without privileges. Database access rights must be set by root.
Creation and modification of databases and tables in MySQL.
Creation of databases.
Creating a database in MySQL is done using the utility mysqladmin.Initially there is only a mysql database for the administrator and a test database, which can be logged in by any user and is empty by default. The example below illustrates the creation of a database.
Or, being in another database, for example in mysql, enter the command:
| mysql>use data1 Database changed. |
Now you can create tables and enter information.
Data types in MySQL.
Before you create tables, you need to be familiar with the data types MySQL supports. They are all presented in the table below:
| BIGINT [(length)] | 8 bytes integer | ||
| BLOB | Binary object (max length 65535 bytes) | ||
| CHAR(NUM) | Fixed length string (1 | DATE | Stores date information. Uses the format "YYYY-MM-DD". Can be modified as a string or a number. YYYY-MM-DD ("- " can be ANY non-digit) YY-MM-DD ("- " can be ANY non-digit) YYMMDD YYMM The range for this data type is 0000-00-00 to 9999-12-31. Unlike TIMESTAMP, DATE accepts years and as two digits from 0000 to 0099. This is not very useful in most cases. Use four-digit years in DATE fields. The DATE type is 4 bytes long. |
| DATETIME | Combining DATE and TIME types. The DATETIME type is identical to the TIMESTAMP type with the following exceptions: When a record is inserted into a table that contains fields of type DATETIME, the DATETIME field is not modified. The range for a field of type DATETIME is: "0000-01-01 00:00:00" - "9999-12-31 23:59:59" when used in a string context, and "00000000000000" - "99991231235959" when used in a number context . The DATETIME type is 8 bytes long. | ||
| DECIMAL (length,dec) | Decimal floating point number. | ||
| DOUBLE [(length,dec)] | A double precision number (4 or 8 bytes) with a maximum length and a fixed number of decimals. | ||
| FLOAT [(precision)] | Floating point number. FLOAT(4) and FLOAT single precision. FLOAT(8) provides double precision. | ||
| FLOAT [(length,decimals)] | A single precision number with a maximum length and a fixed number of decimals (4 bytes). | ||
| INT [(length)] | Integer (4 bytes). | ||
| INTEGER [(length)] | 4 byte integer | ||
| LONGBLOB | Binary object with a maximum length of 2**32 bytes. | ||
| MEDIUMBLOB | A binary object with a maximum length of 16777216 bytes. | ||
| MEDIUMINT [(length)] | Integer (3 bytes). | ||
| REAL [(length,dec)] | Identical to DOUBLE (8 bytes). | ||
| SMALLINT [(length)] | Integer (2 bytes). | ||
| TINYBLOB | A binary object with a maximum length of 255 bytes. | ||
| TINYINT [(length)] | Integer (1 byte). | ||
| VARCHAR(NUM) | Variable length string (1 | TIME | Stores time information. Uses the format "HH:MM:SS". Can be used as a string or number. MySQL TIME type understands the following syntax. HH:MM:DD HHMMDD HHMM HH TIME data is 3 bytes long. |
| TIMESTAMP(NUM) | Automatically changes on insert/update. Has the format YYMMDDHHMMSS or YYYYMMDDHHMMSS. You can modify the TIMESTAMP field when performing an INSERT. This is useful when you want to set a custom date/time for recording. During modifications, you should not specify a value for your TIMESTAMP field, or specify NULL as the value to insert. Otherwise you will get an invalid value for this field. When using mysql with ODBC and Access you should use the value 14 for NUM as this forces MySQL to always use four digits in years. A value of 12 will force MySQL to use two digits in the year. The default value is 14. Note that in the case of tables with multiple TIMESTAMP fields, only the first such field will be updated automatically. |
Creation and modification of tables.
Let's create the customers table in the data1 database:
| mysql>use data1 Database changed. mysql>create table customers (emp_id int(4) not null auto_increment, emp_name varchar(10) not null, emp_lname varchar(15) not null, address varchar(60) not null, phone int(10), primary key(emp_id) ); |
We have created an empty table. You can enter data into it in several ways:
a) manually, using the command insert into;
b) load data from a text file, which is preferable, especially if you need to enter several thousand records. The syntax of this command will be described later.
c)use the mysqlimport utility to also load data from a text file.
Example of manual data entry:
Concerning auto_increment in column emp_id, this means that the numerical value of this column will automatically increase by one with each new entry. That is, if we entered the value 1001, then the next one will be 1002, etc. The value in such a column is entered once to set the starting point, and Then the server will substitute the required values itself.
Syntax of the LOAD DATA INFILE command.
DATA INFILE "file_name.txt" INTO TABLE tbl_name ENCLOSED BY ""] ] [(col_name,...)]Suppose there is a text file 123.txt containing 2000 records that need to be entered into a table. We need to create a table that has the same structure and the same number of fields as the file (as well as suitable data types). Suppose that the fields in file are separated by commas. In addition, the file must be in the desired database. Enter the following command:
LOAD DATA INFILE "123.txt" into table customers fields terminated by ",";
That's all. The data from the file is placed into a table.
To modify tables and data in them, use the commands update and alter table. Let's consider their action using the customers table as an example:
| emp_id | emp_name | emp_lname | address | phone |
|---|---|---|---|---|
| 1001 | John | Walker | New York | 1235468798 |
| 1002 | Bill | Smith | Chicago | 7650945237 |
| 1003 | Jack | Nicolson | Dallas | 9874325097 |
Example of a command action alter table:
You can check it yourself :)
Changing data in tables is done using the command update.For example, let's take the same table buyers.
| mysql>update buyers set address="Seattle" where emp_lname="Smith"; |
The commands are also used to modify tables Drop and Delete.
Delete- deletes a row from the table. For example, if you enter the command
delete from buyers where emp_id="1002"
The line for Bill Smith will be removed.
Drop-if used in Alter table, removes a column from the table.
Team Drop It is also used to delete tables and databases. It should be used carefully, since any deletion is irreversible; data can only be restored from a backup copy.
Common problems and their resolution.
The most common problem is the message Access denied for user... If this is an ordinary user, then the administrator can deal with this, but if the administrator receives such a message, then this is already a problem. Very often, when setting a password for root, the administrator forgets to use the function password(), but simply enters:
update user set password="mamamia" where user="root";
After this, when he tries to enter the database, he receives the message Access denied. This password will not be read. You must enter correctly:
update user set password=password("mamamia") where user="root";
This is a very important step and you need to be careful. The only way out in Windows is to uninstall the server and install a new one, fortunately nothing has been configured yet.
If a user experiences this problem, the reason is probably that the privilege tables are not configured correctly, primarily the same password setting, or the entries in the db and host tables are incorrect. Let's look at this using a simple example:
|
|
A very important nuance: in the User table for jerry, the Select permission is indicated, which is global, that is, valid for any database, even if he does not have access to it. For example, if jerry enters the command:
select * from data2.authors;
he will have access to this table, although access to the data2 database is not assigned in the Db table. Therefore, unless absolutely necessary, you do not need to grant users privileges in the User table, but do this in the Db table for each specific database.
Let's say that jerry is temporarily working in another department, which is in a different domain, and when he tries to access the database, he gets Access denied, because computers in this domain are not allowed to access the database. In this case, you need to do the following: clear the Host field in the Db table, and enter the following data into the Host table:
update db set host="" where user="jerry";
insert into host (host,db) values ("%.domain.com","data1");
insert into host (host,db) values ("monster.domain2.com","data1");
There is no need to specify privileges in the Host table. The main thing is that the data in the privilege tables is not duplicated anywhere, so that there are no contradictions. Data for the user - name and password - must be assigned in the User table, privileges - in the Db table, hosts from which access is allowed , in the Host table. If you enter everything carefully, there should be no problems.
MySQL versions 3.22 and later have a very good GRANT command that allows you to grant users access to databases and tables without manually modifying the privilege tables.
GRANT select,insert update,delete on data1.telephone to jerry@%.domain.com identified by "password";
Using this command, you can specify access privileges even to specific table columns:
GRANT select(id,name,address,phone),update(address,phone) on data2.customers to jerry@%.domain.com identified by "password";
Using this command automatically places data in the Db, Tables_priv and Column_priv tables, eliminating the need for manual modification.
If you need to revoke a privilege from a user, use the REVOKE command.
REVOKE update(address,phone) on data2.customers from jerry@%.domain.com;
Database queries and the Select command.
It's not my intention to go deep into the SQL language, you can read about that in any SQL Server manual, MySQL basically supports all the basic ANSI 92 standard commands, but the command Select deserves to devote a separate chapter to it. The Select command is used to query a database to retrieve information from it. The command syntax is as follows:
SELECT select_expression,... , ...] HAVING full_where_definition rows] ]
As can be seen from the above, together with the Select command, keywords are used, the use of which greatly influences the server's response. Let's consider each of them.
- DISTINCT..
Skips rows in which all selected fields are identical, that is, eliminates duplication of data.
- WHERE.
A Select command clause that allows you to set predicates that can be true or false for any row in a table. Only those rows for which the statement is true are retrieved. For example:
SELECT u_id,lname from publishers WHERE city ="New York";
Returns the u_id and lname columns from the publishers table for which the value is in the city-New York column. This makes it possible to make the query more specific.
- Relational operators.
A relational operator is a mathematical symbol that indicates a specific type of comparison between two values. Relational operators available in MySQL:
Equal > Greater = Greater than or equal Not equal
These operators have standard meanings for numeric values.
Let's say you want to see all customers with a rating greater than 200. Since 200 is a scalar value, like the value in the rating column, you can use a relational operator to compare them.
SELECT * FROM Customers WHERE rating > 200;
- Boolean operators.
Basic Boolean operators are also recognized in MySQL. Boolean expressions are either true or false, like predicates. Boolean operators associate one or more true/false values and produce a single true or false value. The standard Boolean operators recognized in SQL are AND, OR and NOT.
Let's say you want to see all customers in Dallas who have a rating above 200:
SELECT * FROM Customers WHERE city = "Dallas" AND rating > 200;
When using the AND operator, both conditions must be met, that is, all customers from Dallas whose rating is greater than 200 must be selected.
When using the OR operator, one of the conditions must be met. For example:
SELECT * FROM Customers WHERE city = "Dallas" OR rating > 200;
In this case, all customers from Dallas and all those with a rating greater than 200 will be selected, even if they are not from Dallas.
NOT can be used to invert Boolean values. Example query with NOT:
SELECT * FROM Customers WHERE city = "Dallas" OR NOT rating > 200;
This query will select all customers from Dallas and all customers whose rating is less than 200. In this query, the NOT operator applies only to the expression rating >200. You can make a more complex query:
SELECT * FROM Customers WHERE NOT(city = "Dallas" OR rating > 200);
In this query, NOT is applied to both expressions in the parentheses. In this case, the server reads the expressions in the parentheses and determines whether city = "Dallas" or rating > 200 is true. If either condition is true, the Boolean expression inside the parentheses is true. However, if the Boolean expression inside the parentheses is true, the predicate as a whole is false, because NOT converts true to false and vice versa. That is, all customers not located in Dallas and whose rating is less than 200 will be selected.
- IN.
The IN operator specifies a set of values in which a given value may or may not be included. For example, a query
SELECT * FROM Salespeople WHERE city = "Barcelona" OR city = "London";
can be rewritten more simply:
SELECT * FROM Salespeople WHERE city IN ("Barcelona", "London");
IN specifies a set of values by using the names of the set's members enclosed in parentheses and separated by commas. It then tests the various values of that specified, attempting to match the values in the set. If this happens, then the predicate is true. When the set contains number values rather than character values, the single quotes are omitted.
- BETWEEN.
The BETWEEN operator is similar to the IN operator. Unlike defining by numbers from a set, as IN does, BETWEEN defines a range whose values must decrease to make the predicate true. You must enter the BETWEEN keyword with the starting value, the AND keyword, and the ending value. Unlike IN, BETWEEN is order sensitive, and the first value in the clause must be the first in alphabetical or numeric order. For example:
SELECT * FROM Salespeople WHERE comm BETWEEN .10 AND .12;
SELECT * FROM Salespeople WHERE city BETWEEN "Berlin" AND "London"; - LIKE.
LIKE is only applicable to fields of type CHAR or VARCHAR, with which it is used to match substrings. Those. it looks for a character field to see if part of its string matches the condition. It uses wildcards as a condition - special characters that can match something. There are two types of wildcards used with LIKE:
- The "%" sign replaces any number of characters.
The underscore (_) character replaces any single character.
If we set the following conditions:
SELECT * FROM Customers WHERE fname LIKE "J%";
then all customers whose names begin with J: John, Jerry, James, etc. will be selected.
- COUNT.
An aggregate function counts the values in a column or the number of rows in a table. When working with a column, it uses DISTINCT as an argument:
SELECT COUNT (DISTINCT snum) FROM Orders;
When counting rows, the syntax is:
SELECT COUNT (*) FROM Customers;
- GROUP BY.
The GROUP BY clause allows you to define a subset of the values in a particular field in terms of another field, and apply an aggregate function to the subset. This makes it possible to combine fields and aggregate functions in a single SELECT clause. For example, let's say you want to find the highest purchase amount received by each seller. You can do a separate query for each of them by selecting MAX() from the table for each field value. GROUP BY will allow you to put them all in one command:
SELECT snum, MAX (amt) FROM Orders GROUP BY snum;
- HAVING.
HAVING specifies the criteria used to remove certain groups from the output, just as the WHERE clause does for individual rows. For example:
SELECT cid,cname,price,max(price) //max() is also an aggregate function FROM customers HAVING max(price)>500;
HAVING functions similarly to WHERE, but aggregate functions cannot be used with WHERE.
- ORDER BY.
This command orders the query output according to the values in a number of selected columns. Multiple columns are ordered within each other, just like with GROUP BY.
- EXISTS.
Used in subqueries.
SELECT cnum, cname, city FROM Customers WHERE EXISTS (SELECT * FROM Customers WHERE city = "San Jose");
It takes a subquery as an argument and evaluates it as true if it produces any output or as false if it does not. This distinguishes it from other predicate operators, in which it cannot be unknown. For example, we might decide whether to retrieve some data from a Customers table if, and only if, one or more of the customers in that table are in San Jose.
- UNION.
UNION differs from subqueries in that in it no two (or more) queries are controlled by another query. All requests are executed independently of each other, and their output is combined. For example:
SELECT snum, sname FROM Salespeople WHERE city = "London" UNION SELECT cnum, cname FROM Customers WHERE city = "London";
The UNION clause combines the output of two or more SQL queries into a single set of rows and columns.
- DESC,ASC.
DESC-DESCEDENT, output data in reverse order (alphabetically and numerically). Default is ASC.
Well, that's all in a nutshell. MySQL supports almost all the basic SQL Server commands, so you can read more about the SELECT command in any SQL language textbook.
Basic MySQL utilities.
The MySQL distribution includes the following utilities:
Mysqladmin
A utility for server administration. Can be used by the administrator, as well as by some users who are granted certain privileges, for example - Reload_priv,Shutdown_priv,Process_priv And File_priv.This command can be used to create databases, change a user's password (an administrator can change the password for any user, but an ordinary user can only change his own), reboot and stop the server, view the list of processes running on the server. Mysqladmin supports the following commands:
Example of using mysqladmin to change password:
mysqladmin -u bob password rawberry
It should be noted that if you use mysqladmin to set the password, you do not need to use the password() function. Mysqladmin itself takes care of encrypting the password.
mysqlaccess
Used to check user privileges to access a specific database. General syntax:
mysqlaccess options
A useful utility for checking a user's access rights if they receive an Access denied message when trying to connect to a database.
Options:
mysqlshow
Used to show what databases the server works with, what tables each database contains, and what columns each table has. Syntax:
mysqlshow [options] ]]
Mysqlshow can use the following options:
If you enter mysqlshow without arguments, all databases will be shown, if you specify the name of the database, all tables in it will be shown.
Mysqldump
Used to create a dump of the database contents (backup). You can write the database contents to a file. Syntax:
mysqldump [options] ]]
Mysqldump can use the following options:
Isamchk
Using this utility, you can restore tables, manage tables and collect statistics. Syntax:
isamchk [-?adeiqrsvwzIV] [-k #] [-O xxxx=size] [-Si] [-Sr #] [-O keybuffer=#]
[-O readbuffer=#] [-O writebuffer=#] [-O sort key blocks=#] files
Isamchk is used to check the consistency of tables and troubleshoot problems that this may cause. If the user often deletes and adds data in tables, this utility will be very useful. Isamchk can use the following options:
When using the -r option, you need to stop mysqld. Before you start, you need to go to the directory where the table that needs checking or repair is located.
Isamlog
Transaction log, used with the --log-isam=file_name option of the mysqld daemon. The file records all changes that occur in the database. Can be used to restore the database. If there is a backup of the database before the isam log was generated, then the information can be easily restored. If there is no copy, then you need to use all the logs from the beginning of the database.
Safe_mysqld
Script for starting the mysqld daemon in Unix versions. Executed at system boot. To start automatically, you need to add an entry to one of the system initialization files.
| Website creation | | |
- We collect the best databases ourselves
- Automatic detection of the forum engine
- We collect the best databases ourselves
- Charm board powered by smf
- First steps in search engine optimization Simple Machines Forum: removing copyright and external links I require index php topic powered by smf
- Automatic detection of the forum engine
- Torture board powered by smf