How to install games and programs on Windows Phone. Windows Phone initial configuration How to set up on a lumium

 Live Journal
 Facebook
 Twitter
Many users do not like the Windows Phone and Windows 10 Mobile operating system, as it is not as open as, for example, Android. There is even a myth that on WP smartphones you can not install hacked games or programs, since the system accepts applications only from the market ...
In this article we want to refute this myth and tell you how to install hacking applications on a smartphone under the Windows Phone operating system.
This is very simple, you will need to take a few important steps. Follow the instructions carefully and you will succeed.
1. To begin with, you need to have a Microsoft account. Perhaps you created it on the first day of using your Windows Phone smartphone. If you do not have such an account, we suggest reading the instructions:
How to create a Microsoft account (Live ID)
2. After registering the Live ID account, we move on to the installation of the Windows Phone SDK software (without this, you cannot install XAP files on your smartphone). You can install WP SDK on Windows 7 (32 and 64 bits) and Windows 8 (subject to 4 GB of RAM). After the installation of this package, make registration of your WP smartphone. How to do this, you can read in these articles:
Installation of Windows Phone SDK on Windows 7 (32 and 64 bits)
SDK 8.0 installation instructions for Windows 8
Note: For smartphones on Windows Phone 7.5, 7.8 you need to install SDK 7.1, for smartphones with Windows Phone 8 - SDK 8.0.

3. The most difficult thing is behind, now you can safely move on to the installation of hacked games and programs on your smartphone. There are two ways for this: through a standard application from SDK " Application Deployment"or through the program" Windows Phone Power Tools"We recommend the second method, since almost all hacked games are successfully installed through it. Detailed instructions for these two methods can be read in our article.
A Microsoft account is not just a user profile where basic information about him is stored. This is a kind of key that allows you to access all existing services of the company from Redmond. With it you can:
Interestingly, Microsoft does not limit the number of accounts created by one person. Therefore, if you wish, you can create any number of accounts and use them freely.
How to create
You can create a Microsoft account both in the Windows Phone mobile OS itself and on the official Microsoft Account website. This section of the guide covers both options.
On the site
- Go to the Microsoft website and click on the “Login” button.
- Click on the “Create it!” link.

- Click on the “Get a new email address” link.

- In the first empty field, enter the nickname for the new email account, and in the second - the password for it. After that, click on the “Next” button.

- Now you need to specify your phone as a means of additional protection for your account. Select the country code and enter the rest of the number.

- Click on the "Submit Code" button.

- A confirmation code will be sent to the specified phone number. You need to enter it in the Enter access code field and click on the “Next” button.

If you do not want to create an Outlook email, but want to use an existing account registered in another service as a login, then do the following:

Create a Microsoft account on Windows Phone 8.1 and 10 Mobile
If you have just purchased a device with mobile “top ten” on board, and have not yet gone through all the stages of the initial system setup, then follow the prompts on the screen until you reach the point of adding an account. At the same time, do not forget to connect your device to the Internet via Wi-Fi or a mobile network, since without it you will not be able to create a new user account.
- Click on the “Create” button.

- Enter your last name, first name and nickname in the appropriate fields.

- Tap the field under “Domain” and select one of the available options.

- Create and enter a password for your Microsoft account.
- After adding all the data, click on the “Next” button.

- Enter your country or region of residence, date of birth, gender, and proceed to the next step.

- Enter a phone number or a spare email for additional account protection. You can specify both options if you wish.

If you decide to skip the account creation step during the initial system setup and perform this action later, then you should follow the steps below in order to do this from under the system. Since Windows Phone 8.1 and Windows 10 Mobile have different names for the sections responsible for working with accounts, separate mini-guides have been written for each of these systems. Before you begin performing one of them, make sure that the device on which all manipulations will be carried out is connected to the Internet, since without it you will not be able to create an account.
In Windows Phone 8.1 settings

In Windows 10 Mobile settings

How to set up a Microsoft account
Most of the account setup process can be completed using the Microsoft web resource. Here the user is given the opportunity to indicate his personal data or change existing ones, add or change an avatar, attach bank cards to make purchases and subscribe to Microsoft services, unlink his account from devices that no longer belong to him, change his nickname and password. Windows Phone only offers you to set what data to synchronize (mails, contacts, calendars, passwords and topics) and how often you need to check your mail for new messages. The system suggests doing all other actions on the website.
How to change your profile password

How to link a bank card to a Microsoft account

How to unlink Windows Background from your Microsoft account
Before selling Windows Phone or transferring the smartphone into other hands, it is advisable to unlink it from the user account. It is recommended to do this to free up space for other devices. You can link only ten devices with a mobile OS on board, as well as Windows 8, 8.1 and 10, to one account. The entire procedure for unlinking a device from an account is performed on the account management website.

How to change user information

How to make changes
The account, oddly enough, is not permanently linked to a phone with a tiled OS. The user has the opportunity to change it to another, albeit in a somewhat “rough” way - by resetting the settings to the initial state. Windows 10 Mobile, of course, provides a less radical option, but, to be honest, it works a little crookedly - you can only change your account in native applications. This cannot be done in the system parameters. Doing this exclusively in applications is highly discouraged, because after such actions the software begins to behave inappropriately. So in this situation it is best.
How to change email
- Log in to the Microsoft website using your account.

- Select the "Details" section.

- In the next step, click on the link “Set up an email or phone number to log in.”

- Since you are interested in changing your account nickname, you need to click on “Add email address”.

- In the next section, select the most appropriate option from the options provided. You should resort to using the first one if you do not have an email account in mind that could act as a new nickname. The second one is worth choosing if you already have another e-mail. In this case, it is not at all necessary to enter an Outlook or Hotmail mailbox. You can use a Yandex and Google account.

- After entering a new nickname, click on “Add nickname”.

- Click on the “Confirm” inscription located opposite the newly added e-mail.

- Check the email provided. There you should find a letter with a link to confirm that this is the mailbox you want to use as an alias.
- Return to the Microsoft service login management page and opposite the new e-mail, click on the Make primary link.

How to delete an account
There are two options for deleting a user account - from the device and from the Microsoft account database. In the first case, it is carried out, and in the second, an application is submitted on the website to close and delete the account.
How to close your Microsoft account
Microsoft provides for complete account closure. This solution was implemented for those users who do not want the Redmond corporation’s database to include accounts they do not need with their data and files. However, in order to permanently terminate the existence of any profile, Microsoft specialists need to make sure that it was its owner who initiated the closure process and at the same time he will not lose important information that may be useful to him after some time. For these two reasons, complete account deletion takes 60 days.
Before you apply to close your account, please ensure that:
Proceed to the application stage once the profile is ready to be closed:

How to recover your account
For those cases when a user may forget their login or password, lose access to it due to the actions of attackers, or accidentally close it, the bright minds of the software giant have provided ways to recover a Microsoft account. All of them involve the use of tools from the company’s official website.
Before proceeding to the main recovery procedure, you need to make sure of the following:
If all these rules are followed, but you still cannot log into your account, there is a possibility that you are entering the wrong username, password, or your account has been hacked. Below are ways to solve each of these problems.
Password recovery
- On the account management site, click on “Login”.

- Enter your login in the form that appears and click “Next”.

- On the new form, look for the inscription “Forgot your password” and click on it.

- Select one of the appropriate options and proceed to the next step. If you are not sure that you remember the password, then you need to select the first option. If you suspect or are completely sure that your account has been hacked, you should choose the second or third option.

- Re-enter your account login, the symbols from the picture and move on to the section.

- Enter a spare email or mobile number linked to your account, and then click “Send code”.

- Paste the received code and go to the next step.
- Set a new password and write it down.
Login recovery
In the case of losing an account login, everything is much more complicated than with a password. Without it, it is impossible to initiate the process of restoring access to your account, since it is a key element for this procedure. After all, how else can the system know which record needs to be restored if not using a login? You can try to get it, the chances are extremely low.
Login recovery options:
Getting your Microsoft account back after deletion
If it so happens that you accidentally applied for the closure and deletion of an existing account, you have 60 days to restore it. After the specified period, this feature will no longer be available, and the files and data assigned to the profile will disappear forever.
To restore your account, you must first go to the company’s official resource and log into the account that accidentally fell under the distribution. If the data from it is lost, you can try to recover it using the above-mentioned methods.
When you log into a deactivated account, the resource will offer to restore it. Do this by clicking on the “Activate” button.
Recovering a hacked Microsoft account
Hacking of accounts from mailboxes and services is quite common. Every day, attackers gain access to other people's profiles and use them for their own purposes. Most often for sending spam. If your account is unlucky enough to fall victim to the bad guys, you have the opportunity to take it back from them. The process for returning a profile is exactly the same as the procedure for recovering a password. The only difference is that when choosing the reason for the inability to log into your account, you should indicate I think someone else is using my Microsoft account.
Video: how to create a Microsoft account on Windows Phone
We hope this guide helped you get answers to your backlog of questions related to your Microsoft account.
Thanks to Windows Phone 8's strict design rules, all devices running Microsoft's latest phone software experience the same experience. Unlike Android, manufacturers were not given much freedom to deeply customize Microsoft Windows for their own software. This means that most of the tricks used on your Lumia 920 will also work on other Windows Phone mobile phones, such as the HTC, 8X, Lumia 820 and Samsung Ativ S.
Here are our top 25 tips and tricks that will work no matter what second-generation Microsoft phone you own.
1. Children's corner
To keep bullies and pranksters in line, Windows Phone 8 has a feature called Kids' Corner. To activate it, go to settings and select the appropriate option (it should be between “location” and “battery saver” in the settings if you are at a loss) and turn it on. You'll then see a number of additional options, including games, music, videos, and apps. From them you can select content that you think is allowed for prying eyes; you can enable them when the “Children’s Corner” option is running.
Once you've mastered the switch, click the "launch children's corner" button to see what it all looks like.
Kids Corner is activated, you can access it by swiping from right to left. You should now see Kids Corner and then swipe up from the bottom of the screen to unlock the screen. And now you have a child-friendly phone that is denied access to calls, email and other important functions that you would like to keep from being reconfigured.
2. Photo editing
Once you've taken or uploaded a photo, navigate to the image you want to edit and then click the ellipsis button in the bottom right corner. You will then see several options from which you must select "edit". From there you will have access to several options: crop, rotate and auto-correct, etc.
Select the desired option and click the ellipsis again (this feature will be a permanent feature in Windows Phone 8) to reveal the options: "save", "rotate", "crop", and "adjustment". The rotate tool moves the image 90 degrees every time you click on it. Crop creates a grid that you can use to crop the image by moving each colored corner. When you are satisfied with your work, click on the accept changes icon. Or instead of all this, just choose one of the predefined proportions
Finally, click the "auto-correct" button to see if it improves the quality of your photo. If the image was dark and/or cloudy, this feature may be useful. But the effect may vary from image to image. All that's left to do is save the image in the Camera roll section for future access.
3. Linking e-mail in the "Inbox" section
If you want to keep your emails linked together so that all your incoming mail is stored in one place, you can use the link in-boxes option. Simply go to one of the email accounts in which you want to link messages and click on the ellipsis "..." button. Select "link inbox" and then select two messages in your inbox that you want to link.
You can easily delete the message link later in exactly the same way. In the e-mail client, select the messages that you want to disconnect by selecting them and simply click “delete connection”. You can also rename your inboxes from this menu.

4. Text translation
You can translate a menu or road sign into another language with Windows Phone 8. It does not require a permanent data connection, however, as soon as the data is sent to Microsoft servers, you will receive the translation on your phone. Assuming that you are not bothered by roaming fees abroad, click the search button at the bottom of the phone (the button is the rightmost of the 3). Now click on the eye-shaped button to turn on the camera, allowing you to scan barcodes, QR codes, etc. Click the "scan text" button to take a photo of the text and then click "translate".
If your phone reports an error, try taking the image again directly. After successful OCR, select the language you want to translate from the list, and Windows Phone 8 will try to provide the clearest translation possible.
5. Take a screenshot
This is a nice and easy trick. Navigate to what you want to capture and then click the button lock/power and a button Home(Windows) simultaneously. If you do everything correctly, you will hear the camera click and a screenshot will be taken.
To find your screenshot, go to “photos” and then “albums”. Here you will find the "screenshots" folder.
6. Identify the song and its artist
Using Xbox music and a data connection, Windows Phone 8 can listen to songs and try to tell you what the music is. This is done by clicking on the "Search" button in the bottom right corner, then selecting the second option under any Bing image and tapping the "Music" icon in the bottom menu. After pressing, the phone screen will display the message “listening to music...” If the song is found, the singer and album will be determined, so you can download it right there. If it doesn't work out, you will have the opportunity to try again later.
7. Battery saving
There is a "battery saving" option in the settings. When enabled, your phone's built-in battery life will be extended, but keep in mind that you will need to manually check for new mail and apps will no longer run in the background. At the bottom there is a summary of how long the battery will last, assuming you are not looping through streaming video.
When this feature is enabled, you can click on "Advanced" at the bottom of the screen (it is grayed out if the option is disabled) and choose the moment at which the mode should turn on automatically, or should it remain active all the time.

8. Sendmessageabout rescheduling the meeting
In the "calendar" section you can view all the events that you have added. If one of these meetings involves another person, your colleague, friend, etc., you can send them a message that you are running late.
To do this, go to your calendar and select an appointment. At the bottom you will see four options, one of which is called "late" and is indicated by a "running man" icon. Click this button and the message will be automatically generated with some standard apology text that you can edit or send as is.
9. Skype calls
After downloading and installing Skype from the Windows Marketplace, you will find it in your applications section. Open the application and sign in to your Skype account. If you don't have a Skype account, you can choose to sign in with a Microsoft (Hotmail) account. If you are logged in, you can view recent calls and see who is online. To establish a contact, select the person, then enter a message in the text chat, or press the button below on the phone to call.
10. Setting the text size
There is an option in the settings called "Accessibility". Here you can scroll the slider to change the text size for easier reading. You can also turn on the "High Contrast" option to improve readability, screen magnifier and queue on TTY/TDD - telecommunication systems to assist people with hearing or speech impairments.

Log into Internet Explorer and click the Stop icon. Scroll down to select Settings and here you can configure a number of features. One of the options is "use the address bar button to..." which you can select and then choose from three preferred options, one of which is tabs. If you select this feature, you can switch between tabs without entering the options menu.
12. Setting up Windows Phone 8
Windows Phone 8 lets you personalize your phone. Tiles can be resized by swiping them from top to bottom on the Home screen, or from the App drawer. Entering edit mode causes the specified tile to glow and dims the others. You can either press the lower right button with an arrow to configure the size, or rebuild the tile, pressing the hairpin in the upper right corner. It should be noted that unpinning is not uninstallation.
To change the position of a tile, move it with your finger to the desired location, then quickly click on the tile to exit editing mode. If you need to move a few tiles, just select the next active tile for tuning and drive it to a new place.
You can also customize the accent color by going to the settings menu and then to the "theme" section. Select the background color from dark to light. Go back to settings and you will see another option called "lock screen". Click this button and customize the tab bars visible on the lock screen, followed by the option to choose your primary tab.
13. Search the Web page
In the browser, this search tool is called "find on page". It was previously removed from Windows Phone with the Mango update, but has now been brought back. If you're running Internet Explorer, click the icon that appears and select "find on page" at the bottom of the list. Enter your search term and press Enter. All found text will be highlighted in the accent color you selected, and in the highlighted part you will see a down arrow key, it is needed to move down through the search results.

14. Keyboard shortcuts
When using the on-screen keyboard, you can enter the "&123" option to switch between text, special characters, and numbers. To save time, you can hold your finger on each key to see other options for how they work, including numbers or other useful symbols such as a question mark. For languages, you can switch between installed ones almost instantly. Convenient right?
Another useful feature built into the keyboard includes a word suggestion. Enter a few letters of the word and hints will be shown above. Move right and left between them and then select one by clicking it. Finally, double-tapping the space bar adds a period and space for the next phrase.
If the keyboard cannot recognize the word you entered, you can press it to highlight it and then press the "+" symbol above. This will add a new word to the dictionary for future use.
15. Adding a language
Return to the main installation menu and select "language+region". Here you can select your language with the option to download and install it. After this, you can easily switch between the desired languages.
If you want to configure the interface language, go to “general settings”, and then “speech” - this is lower in the list than “language + region”. Once again, you can customize languages for each feature, including the text-to-speech voice feature.
16. Create a room
It's very nice and simple. Browse through the list of people and the word "together" should appear. From here, click the "+" button at the bottom and then select a room or group. Groups have less functionality, so we'll focus on rooms. Select the “room”, choose a name, and click on the “save” button in the form of a floppy disk at the bottom. This is how Windows Phone 8 will set the room.
You can then click the "+" button at the bottom and add the people you want to include in your room. As with the list of people, you can scroll up and down the room, search for a specific name using the Search button at the bottom, or click one of the colored letters to jump to the desired part of the alphabet. Once you've added everyone you want to include, click the button to complete the addition, and your friends can now receive a notification that they've been included in the room if they also have a Windows Phone 8 device. From here, you can then share photos, chat, chat, make appointments, or publish your location to everyone in the room.

17. When in doubt, press and hold
I mentioned this briefly before, but I can't overstate the importance of this advice. If you don't know how to use something, either press the button or press and hold until the options are displayed. Windows Phone 8 is very easy to use, but if you're stumped, this light may be just the solution you're looking for.
18. Copy and paste
If there is text on the screen you can click on it and it will be highlighted. To highlight multiple words, a bar with two round ends will highlight all the text you swipe over. This process may be inconvenient due to the size of the text letters, or the text of web pages, try enlarging it (zooming the screen with two fingers - pinch) to make your life easier.
Once something has been copied, you can paste through the clipboard tool one of the options that will appear above the on-screen keyboard.
19. Using your phone as aremote controlXbox 360
If your Xbox Online and Windows Phone are on the same network (in Settings you can find Wi-Fi and connect to your home router), you can download and install the Xbox SmartGlass app formerly known as My Xbox Live. Once installed, open your Xbox hub, select the app, and then make sure your Xbox is turned on as well. The app will then sign you in before giving you control of your Xbox.

20. Using cloud storage
If you download and install the Skydrive app, you'll be able to manage your cloud storage on the go, but even without it, you can still access your clouds. Once you've taken a photo, you can click on the elliptical button and select "send to Skydrive."
21. Improve the sound of your media
On Nokia Windows Phone devices, you can insert headphones and then adjust the sound quality through the "audio" menu in the "general settings" menu. You can choose from several predefined settings, or customize the equalizer for yourself. Additionally, you can enable Dolby playback by swiping right and tapping "play."
While bass lovers may be tempted to crank up the low end of the EQ, the best sound quality, in my experience, can be achieved using the Dolby option. Other factors, including headphones, can also affect the final result.
22. Multitasking
Although, strictly speaking, there is no multitasking in the sense that it is done in Android, Windows Phone 8 has its own system for working with several tasks at the same time. To navigate between tasks that are running, hold the back button until the screen is minimized and a color appears around the display. Now swipe left or right between tasks and select the one you want.
23. Payment for goods using NFC(payment for goods and services by holding the phone to the reader)
Depending on the retailer, you can now pay for items using your phone, making it a digital wallet of sorts. Just bring your phone to the NFC reader in the store, the phone will do everything else at this time as long as you have the “tap+share” function enabled in the general settings.
If you've already added a credit card or PayPal to your Microsoft account (which you've done for in-app and music purchases), you'll need to enter your payment details in the "wallet" field found in your app drawer. Here you can click the "+" button at the bottom and then enter the required information.
If you visit a store regularly, you should ask the seller if the cash register supports NFC. So, in the future, you can save yourself from scanning your card and entering the pin code.

24. Record keeping
Unlike Windows Phone 7, the OneNote app is slightly redesigned in Windows Phone 8. Download OneNote from the apps section and you can create, edit, or share notes. To search for a specific entry, use the magnifying glass button, and the "+" button to add a new note.
As long as you have an active data connection, your changes will sync across the cloud, keeping your notes up to date on every device you own that runs OneNote. No more sending yourself emails with a shopping list.
25. Creating and editing documents
Last but not least, you can create and edit documents. Go to the Office hub and then click the "+" icon at the bottom to add a new document. You can select Word and Excel, and then start typing. You can also choose one of the templates if you wish.
Once you're in a document, select the ellipses icon button to reveal the available options. "Outline" lets you jump between sections quickly, while "Comments" lets you add comments to shared documents so you can let people know you're working or point out what needs changing. You can also search for a specific word or phrase and, of course, change the document itself. When you click on the "edit" button, it scrolls through the document and you have to click on a word before using the on-screen keyboard to make adjustments.
It’s hard to even think about and imagine your smartphone (for example, Dell Venue Pro, HTC Arrive, HTC 7 Pro, HTC HD7, HTC HD7S, HTC Mozart, HTC Surround, HTC Trophy, HTC Titan, HTC Titan II, HTC Radar, Nokia Lumia 610, Nokia Lumia 710, Nokia Lumia 800, Nokia Lumia 900, LG Optimus 7, LG Quantum, Samsung Focus, Samsung Omnia 7, Samsung Focus Flash, Samsung Focus S, Samsung Omnia W) without working Internet, which makes it possible to realize a large share of the device’s capabilities on Windows Phone. Therefore, if you become the proud owner of a Windows Phone phone, first set up the Internet on it. Of course, you can try to get automatic settings from your operator, but often they either don’t arrive at all, or they can’t be saved, so it’s best to do the settings right away and manually. Setting up the Internet is actually not that difficult and the whole procedure will take literally 5 minutes . First, you need to go to the “Settings” menu and almost at the very bottom find the “Access Point” item, which you need to go into. Surely you will already have some access points there, but it is better to simply “Add” a new one, since the standard ones often do not work.


You can use the settings below. they were all tested, and some were added by our users and were also tested to work. No problems were found.
MTS:
Access point (APN): internet.mts.ru
Username: mts
Password: mts
Megaphone:
Access Point (APN): internet
Password: leave blank.
Beeline:
Access point (APN): internet.beeline.ru
Username: beeline
Password: beeline
TELE 2:
Access point (APN): internet.tele2.ru
Username: no need to fill in
Password: no need to fill in
LIFE Ukraine:
Access point (APN): internet.life.com.by
Username: leave blank.
Password: leave blank.
MTS Belarus:
Access Point (APN): mts
Username: mts
Password: mts
Baikalwestcom Irkutsk:
Access point (APN): inet.bwc.ru
Username: leave blank.
Password: leave blank.
As an example, I’ll show you how these settings look on and, the Megafon operator is very convenient in that you don’t need to enter anything else except the access point itself!


You need to first select “Enabled” in the “Data transfer” mode, and after that select “3G” in the “Fastest connection” option. Once you save all the settings, try loading one page into Internet Explorer on your phone, or test the Internet in any way. If it doesn't work, reboot the device.
Operating system developers strive to make them as intuitive and user-friendly as possible, and company employees are no exception. Windows Phone OS is quite easy to use, so installing applications while working with it is a matter of a couple of clicks. However, sometimes users have problems, so we will look at the program installation process in more detail.
To install an application on Windows Phone from the Windows Store, you need to follow a number of simple steps:
Step 1. Launch the Store application from the main menu of your smartphone
Step 2. Select the desired program or game and press the " For free"(possible options " Buy", if the application is paid, and " Install"if it was already installed on the device)

Step 3. Wait until the utility is downloaded and installed on your smartphone

Step 4. Launch the program from the Store or the main menu of the phone

Installing xap files
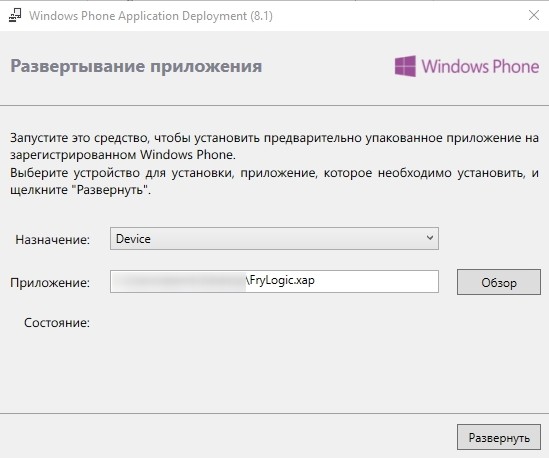
Applications in *.xap format can be installed from a computer by connecting it to a smartphone. To do this, you will need the Windows Phone 8 SDK, which can be downloaded from the official Microsoft website. After downloading and installing the package, a number of utilities will appear on your computer, including Windows Phone Application Deployment, which is needed to install the program on Windows Phone. The sequence of actions is as follows:
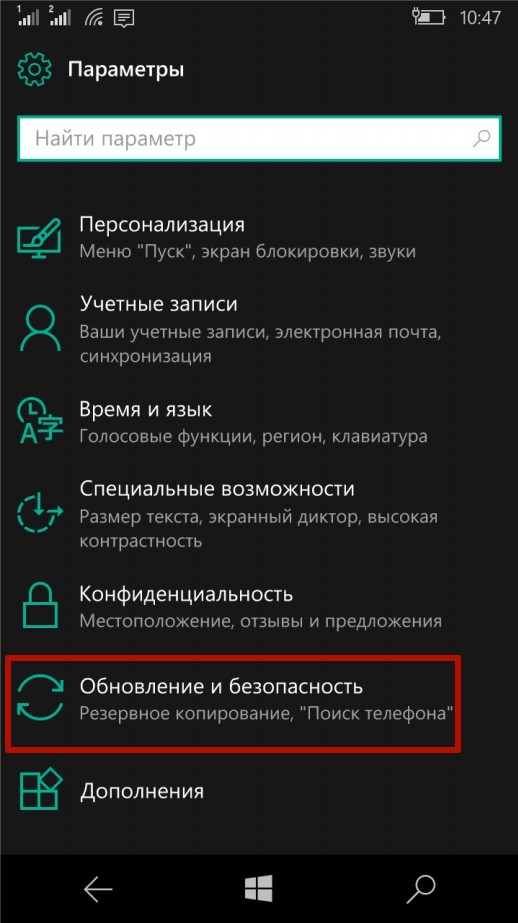
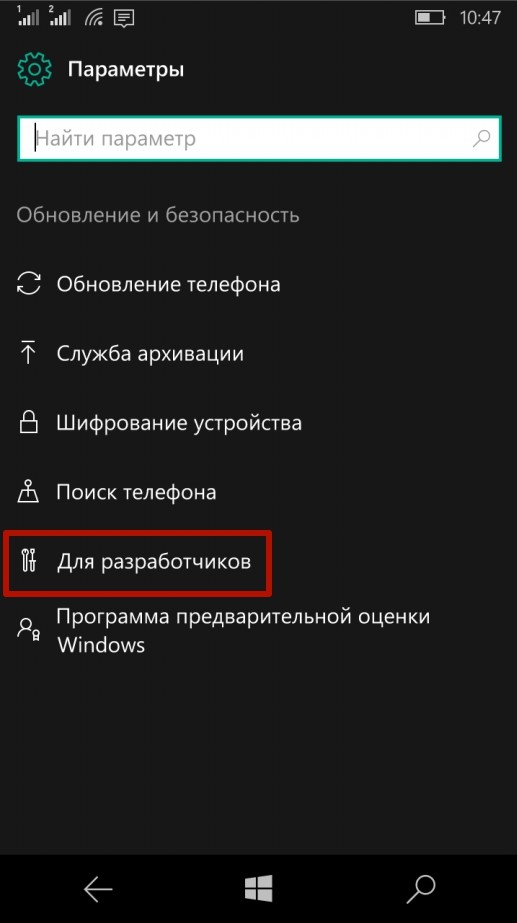
Step 1. Launch the Settings application on your smartphone, go to the “ Update and Security", select the item " For developers", set the switch near the inscription " Developer Mode" and press the button " Yes»

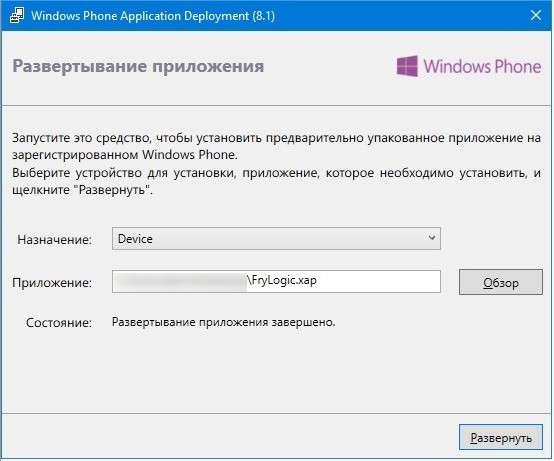
Step 2. Run the program on your computer Windows Phone Application Deployment, connect a smartphone with an unlocked screen to it, select the application that you want to install on the device, and press the “ Expand»
Step 3. Wait until the installation of the utility on your phone is completed (the device’s screen must be unlocked during the process)
Step 4. Disconnect your smartphone from your computer and check the installed application in the main menu

Installing Android applications on Windows Mobile
Microsoft was developing the project Astoria, which could enable users to install applications on Windows 10 Mobile, originally developed for the Android OS. However, in the end, work on the project was stopped, so at the moment it is impossible to install and run Android programs on smartphones running Windows Mobile.
- What formatting is applicable to cells in Excel
- How to include in "Word" spelling verification: Instruction
- How to use a restorative brush and patch in the Photoshop program?
- Checking spelling in Word Dictionary for checking spelling in Word
- GIF editing programs for editing GIF animation from images
- How to create a page with frames to create frames for web pages in html
- Practical work on Frontpage