Problems uninstalling updates

 Live Journal
 Facebook
 Twitter
Did you just install the April 2018 update? If so, more than 10 GB of data is missing from your hard drive. On a laptop or tablet with limited memory, this can be very annoying.
If you have a computer with a lot of available storage, you may not even notice this useless data. They will remain for about 10 days until Windows automatically clears them. But, if you already have little memory on your hard drive, then you will probably want to delete them yourself.
These files allow you to rollback changes within 10 days
Upgrading between "builds" of Windows 10, such as the Fall Creators Update for Windows 10 or the April Update, is treated the same as upgrading to a completely new Windows operating system.
When you upgrade to a new “build,” Windows creates a Windows.old folder containing system files from your “old” Windows installation. This allows you to "roll back" to a previous build of Windows 10 if you have a problem with the new build.
However, this folder uses more than 10 GB of space on your hard drive. Windows will automatically remove it after 10 days, but you can remove it sooner to immediately free up space.
You can go back to the latest version of Windows 10 you installed by going to Settings > Update & Security > Recovery and clicking the Get Started button under “Go back to a previous version of Windows 10.” This button is only present if the files are still available on your computer.
How to delete the Windows.old folder
If everything works fine after a few days, you can delete these files. You don't need to delete the Windows.old folder manually.
Starting with the Windows 10 April 2018 Update, you can erase these files using the new Free Space tool in Settings. To access it, go to Settings > System > Device Storage > Free up space now.

Check the Previous Windows Installations option in the list. You'll see the amount of space you'll save next to it here.
If you don't see this option in the list, then either you have already deleted these files, or Windows 10 has already deleted them for you.

Select the other types of data you want to delete, and then click the "Delete Files" button at the top of the window. Safely delete all types of data here if your computer is working properly.

How to Delete the Windows.old Folder Using Disk Cleanup
You can also use the Disk Cleanup tool, which will clean everything up for you. To run it, open the Start menu, search for Disk Cleanup and press Enter.

Check the Previous Windows Installations option in the list. You can also check other types of files that you want to delete from your hard drive to free up space.
Click "OK" after you have selected what you want to delete. Disk Cleanup will remove previous Windows installation files and free up space on your hard drive.

If you need to go back to a previous version of Windows 10 after deleting these files, you will have to reinstall Windows 10 from the installation media with the old build.
Whenever you run an update to the Windows 10 operating system, all available update installation files are automatically cached. This is done so that you can reapply Windows updates at any time without downloading them again. But the bad thing about this story is that the Windows update cache folder is constantly growing in size, eventually taking up all the usable space on your computer’s hard drive. Therefore, to avoid this, I offer you clear step-by-step instructions, How to delete the entire update cache in Windows 10 (Windows Update).
Removing the Windows Update Cache
Clearing the update cache isn't a difficult task, but it's also not as easy as it should be. Yes, you can use the standard system Disk Cleanup utility, but it does not remove the Windows Update cache completely, so I recommend that you use the following manual method.
1. First, you need to stop the Windows Update service. To do this, click the search button 🔎 (located next to the start button) on your desktop and enter the search phrase “services”. Then, right-click on the found application Services and run it as administrator.

After that, in the list of all services on your system, find the service Windows Update, right-click on it and select the option Stop. This action stops the Windows Update service completely.

2. After stopping the Windows Update service, press the keyboard shortcut Win+R, enter this path into the window that appears: C:\Windows\SoftwareDistribution\ and click the button Enter.

This is the same folder in which Windows 10 stores all files related to operating system updates. Go to the folder Download, select all the files in it and delete them. The system may ask for administrator rights to perform this operation, but you just click on the button Continue to complete the procedure.

3. If you want to get even more free disk space, you can also delete files in the folder DeliveryOptimization. But before you do this, you need to disable the feature Windows Delivery Optimization. To do this, find the application Check for Updates in the manner described in step No. 1 and open it.

In the window Update&Security on the left select the item Windows Update and click on the link Advanced options.

Once the advanced options window opens, click on the link .

In the window that opens, click on the button below to disable the function in Windows 10 Delivery Optimization.

After turning off this feature, press on your keyboard again Win+R, enter the following path C:\Windows\SoftwareDistribution\DeliveryOptimization and click the button Enter.

When the folder opens, select all the files in it (keyboard shortcut Ctrl+A) and delete them (button Delete on keyboard).

Before deleting files, you can check their total size. To do this, select all the files in the folder, right-click and in the menu that appears, select Properties. In my case, all files and folders took up almost 7 GB of hard drive space.

4. Once you are done with the above procedure, don't forget to open the app again Services(see step #1) then right click on the service Windows Update and select the option Start. This action restarts the System Update service (Windows Update) that you previously stopped.

This The easiest way to clear the update cache in Windows 10. In the comments, share your thoughts and personal experience in resolving the issue of clearing the Windows Update cache.
Windows Update is an important component of operating system security from external and internal threats. However, the central heating service is also subject to errors, which disrupts the natural progression of system improvements with updates. In such cases, the user needs to intervene in the system update process in order for the OS to continue to work like a clock.
Reasons to remove old updates
The reasons for deleting old updates can be very varied:
- saving disk space;
- low-quality (disturbing the operation of the system), outdated update;
- update files were installed with an error, etc.
Each of the reasons stated is sufficient to interfere with the operation of the system in order to debug it.
As my experience shows, in operating systems that have been running for six months or more, it is almost necessary to remove old updates. Firstly, updates clutter up the system disk, and the more space there is, the better Windows works. Secondly, updates can overlap each other, which causes file paths to become confusing, which also incorrectly affects the system’s performance.
Is it possible to remove updates?
Of course, updates can be removed, but with some nuances:
- the update must be removed correctly. Regular deletion of files will lead to undesirable consequences, including the crash of the operating system;
- Not all updates can be removed. Some, especially those related to Windows Defender, are vital to the secure operation of the system;
- You need to be careful when choosing which update to remove. It is quite possible that it is not old and unnecessary. This means that the system will install the update again.
Removing old updates
If it comes to removing irrelevant updates, the user has a whole range of options to complete the uninstallation procedure. You don't have to deny yourself anything: the command line, the good old update log, and even the rarely used disk cleanup tool. The uninstallation process itself is similar to uninstalling a simple program, with only one exception - after that you need to restart the computer.
Removal via "Control Panel"
The interface of the “Control Panel” (CP) element is increasingly reduced in capabilities with each update of Windows 10. However, it is impossible to completely replace it with the “Settings” of the computer, and most applets are still in full working order. Uninstalling programs and updates is no exception.
- Open the “This PC” window, click on the down arrow in the address bar and select “Control Panel” in the window that appears.
 Through Explorer, open the “Control Panel”
 - In the “Programs” column, click the “Uninstall a program” link.
 In the “Programs” column, click the “Uninstall a program” link
 - In the column on the left, click on “View installed updates.”
 Open the list of updates through “View installed updates”
 - Next, by clicking the mouse, select the update that needs to be deleted and click the button of the same name that appears next to “Arrange”.
 Select the update, click “Uninstall” to begin uninstallation
 - Then it’s simple: we agree to the deletion and wait for the process to complete. Afterwards, it is recommended to immediately restart your computer.
Some updates, especially Office service packs, do not require a restart. But my experience shows that if you do not restart your computer immediately and access deleted files, you may experience some freezes and slowdowns of the computer.
Removal via Settings Windows 10
The Settings environment also includes the ability to remove programs, components, and system updates.

Uninstall via command line
The Command Line tool allows you to do almost everything with the operating system - from restarting processes and the system as a whole, to uninstalling programs and updates.

Removal through a third-party program
The modern software market offers almost a full range of “substitutes” for standard utilities from Microsoft. Removing programs and components is no exception. Such products are often more convenient in terms of interface and functionality compared to Windows utilities. One such program is Revo Uninstaller.
 Revo Uninstaller is a program that replaces the Uninstall Programs tool.
Through system disk cleanup
The only "true" way to remove really old old and unnecessary updates is with the system's Disk Cleanup utility. In this case, the system itself will automatically determine which updates can be removed.
- Open the “Control Panel”, click on the “System and Security” column.
 Open the “Control Panel”, click on the “System and Security” column
 - In the “Administration” applet, click on the “Free up disk space” button.
 In the “Administration” column, select “Free up disk space”
 - We are waiting for the program to collect all the data on the system. Then we check the checkboxes for the groups of files that need to be deleted and start the cleaning process with the OK button.
 Check the box next to “Clean up Windows updates” and click OK
The process of removing updates is very long and should definitely not be interrupted. The case shown above, with the deletion of 2.66 GB of update files, lasted more than an hour.
How to clear the update cache, fix the error of uninstalled or stuck updates in Windows 10
Often, in cases where the Internet blinks, power surges occur, and in some others, downloading updates may occur with errors. In such situations, the operation of the update service is disrupted; it tries to access files that contain an error, which causes the whole process to go wrong. Updates cannot be installed, or they can, but at the same time they carry an error, which can affect the performance of the entire system. User intervention is required to troubleshoot.
- Open the “Control Panel”, follow the path “System and Security” - “Administration” - “Services”.
 Go along the path “System and Security” - “Administration” - “Services”
 - In the list of services we find “Windows Update”, double-click the service properties. Change the “Startup type” filter to “Disabled” and save the changes with the OK button.
 In the service properties, change “Startup type” to “Disabled” and click OK
 - Reboot the computer. Then, using any file manager, go to the C:\Windows\SoftwareDistribution\Download folder and delete all its contents. This will delete the entire update cache.
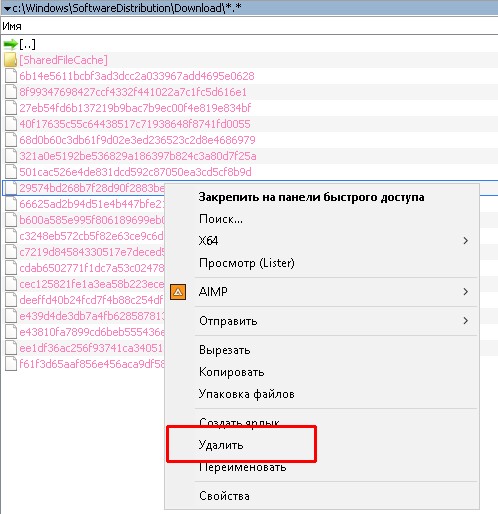 Select and delete all files in the folder
 - If the problem with already installed updates is also present, delete the contents of the C:\Windows\SoftwareDistribution\DataStore folder.
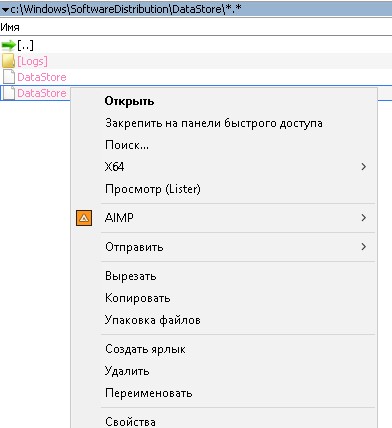 Select files in the folder and delete them
 - Next, similar to shutting down, turn on the Windows Update service and restart the computer.
- We repeat the search procedure and install updates.
How to remove the update icon
Users of Windows 7, 8, 8.1 will sooner or later have an icon appear on the notification panel that will say that the system can be updated to Windows 10. In fact, this means that sooner or later the update will happen almost forcibly, against the will of the user. If you don't want this to happen, you just need to uninstall one update.

Prohibition of installing individual updates
Microsoft has provided a special mechanism for uninstalling certain updates. This feature is not particularly replicated to ensure that users install absolutely all expected updates.

Problems uninstalling updates
As my extensive experience with Tens updates shows, there are practically no problems with deletions. The only thing that can harm the system is the removal of current and necessary updates. This will lead to undesirable consequences and incorrect operation of system files. Therefore, it is very important to delete only old and unnecessary updates and to properly clear the update cache.
The system is subject to so-called external risks, when software failures cannot correctly perform their tasks. Problems with removal in the vast majority of cases occur in two cases:
- when system files are damaged by viruses;
- when system or update files are damaged by disk errors.
First of all, if any operating system errors occur, you need to check your computer for viruses and malware. To do this, you need to use more than one program, this will increase the possibility of detection.
After checking, you need to scan system files, as well as the file system.
- Open the command line as administrator.
- We enter two commands one by one:
- sfc /scannow - checks system files and, if necessary, restores missing elements;
- chkdsk C: /f /r - checks the disk for errors and, if necessary, corrects damaged sectors.
- We definitely wait until the process is completed. Each running utility runs for quite a long time, sometimes more than one hour.
System rollback after unsuccessful updates
System updates often affect core system files. Therefore, if there are possible failures during the update, important components of the OS may be so damaged that Windows simply stops loading. In order not to lose important data, it is recommended to regularly create system restore points. This tool will help you get your OS back up and running if updates, viruses, or disk errors cause Windows to crash.
In order to use the restore point tool when the OS is not working, you need to have a bootable Windows 10 USB flash drive.
- In the BIOS settings, we change the method of loading the OS to USB-HDD or similar, depending on the manufacturer of the motherboard.
- In the installation window, click the “System Restore” button.
 On the installation screen, click “System Restore”
 - Next, select “Troubleshooting”.
 Go to the “Troubleshooting” element
 - The following items: “Advanced options” - “System recovery”.
 Go along the path: “Advanced options” - “System Restore” and select a point to restore
 - Next, select one of the last saved restore points and wait until the installation program returns Windows to a working state.
In my personal experience, sometimes a restore point is not enough to get the system back to working order. Personally, I think it’s better to accept it and do a clean installation of the system from the latest distribution, which already has all the necessary updates installed. If the update became so crooked that the operating system crashed, there is no guarantee that re-installation will not lead to the same result.
Video: how to launch a restore point
Clearing the update log
The update log contains information about all attempts to install updates, drivers and programs by the system. Essentially this is useless information that can also be deleted.

It is worth clarifying that the above instructions will only delete the update log, that is, information about them. The updates themselves will be in perfect order, their list with the ability to delete each individual update will still be present in the Control Panel applet.
Video: How to clear Windows 10 update history
It is very easy to remove a particular OS update. You just need to not deviate from the instructions above and not delete anything unnecessary.
System update - necessity or excess? Well-functioning mechanism of a Swiss watch or a chaotic flow of data? Sometimes situations arise when it is necessary to remove updates that, in theory, should stabilize the operation of Windows 10 or other systems. The reasons may be different, be it an incorrectly installed upgrade or a reluctance to make changes to save space on the hard drive.
How to remove the latest installed updates on Windows 10
It often happens that a freshly installed OS update harms the performance of your computer. Problems can occur for a number of reasons:
- the update may have installed with errors;
- the update does not support the drivers that are installed for the correct operation of your PC;
- When installing updates, problems occurred that resulted in critical errors and disruption of the operating system;
- the update is out of date and did not install;
- the update was installed two or more times;
- errors occurred when downloading updates;
- errors occurred on the hard drive on which the update is being installed, etc.
Photo gallery: errors when installing Windows 10 updates
Windows Update database corruption errors Duplicate Windows 10 update in Update History Updates fail due to hard drive failure
Uninstalling updates via Control Panel
- Open the “Control Panel”. To do this, right-click on the Windows icon in the lower left corner of the screen and select “Control Panel”.
Right-click on the Start menu and open Control Panel
- In the window that opens, among the set of elements for managing your OS, we find the “Programs and Features” item.
In the "Control Panel" select the "Programs and Features" item
- At the top left we find the link “View installed updates”.
In the left column, select “View installed updates”
- Click on the update you need. By default, it is sorted by date, which means that the required update will be among the top if several upgrades were installed at once, or at the top when only one was installed. It needs to be removed if it is because of it that problems arose. Left-click on the element, thereby activating the “Delete” button.
Select the required update from the list and remove it by clicking on the corresponding button
- We confirm the deletion and restart the computer. Some updates may not require a reboot.
Uninstalling updates via Windows Update
- Open the Start menu and select the Settings item.
Select the “Settings” item by opening the “Start” menu
- In the window that opens, select the “Update and Security” environment.
Click on the item “Update and Security”
- In the “Windows Update” tab, click on “Update History”.
In Windows Update, look at the Update History.
- Click the “Uninstall updates” button. Select the upgrade you are interested in and remove it by clicking on the corresponding button.
Click “Remove updates” and remove incorrect upgrades
Uninstalling updates via the command line

Instead of [update number], enter the numbers from the second column of the list displayed by the command line. The first command will remove the update and reboot the computer, the second will do the same, only it will reboot if necessary.
All updates are removed in similar ways. You only need to choose which upgrade will incorrectly affect the operation of the OS.
How to delete Windows 10 updates folder
The magic folder is named WinSxS; all updates are downloaded to it. After a long service life of the operating system, this directory becomes increasingly overgrown with data that is in no hurry to be deleted. No wonder experienced people say: Windows takes up exactly as much space as it is given.
Do not delude yourself into thinking that the problem can be solved with one click on the Delete key. A simple, rough deletion of the folder with updates in any version of Windows can lead to deterioration of the OS, slowdown, freezing, refusal of other updates and other “joys”. This directory should be cleaned using operating system tools. This safe operation will free up as much memory as possible.
There are several ways to optimize the updates folder:
- Disk Cleanup utility;
- using the command line.
Let's consider both methods in order.

The second method is even faster, but it does not clean the entire system or other disk and deals exclusively with OS updates.

How to cancel a Windows 10 update
Unfortunately or fortunately, canceling Windows 10 OS updates is not so easy. In the simple settings you will not find an option to refuse to receive new upgrades. A similar function is not included in the “Ten”, because the developers promise lifelong support for this system, which means they guarantee its stability. However, threats, new viruses and similar “surprises” appear every day - accordingly, your OS must be updated in parallel with them. Therefore, it is not recommended to disable system updates, although this can be done in a workaround.
- Right-click on the “This PC” icon on the desktop and select “Manage.”
Using the context menu of the “This PC” icon, go to “Management”
- Select the “Services and Applications” tab. In it we enter “Services”.
Open the “Services” of the computer through the “Services and Applications” tab
- Scroll down the list to the required Windows Update service and launch it by double-clicking.
Open Windows Update properties by double-clicking
- In the window that opens, change the filter in the “Startup type” column to “Disabled”, confirm the changes with the OK button and restart the computer.
Change the “Startup type” of the service to “Disabled”, save the changes and restart the computer
Video: How to cancel Windows 10 update
How to delete Windows 10 update cache
Another option for cleaning and optimizing your system is to clear cached information files. A full update cache can affect system performance, cause it to constantly search for new updates, etc.

Video: How to clear Windows 10 update cache
Programs to remove Windows 10 updates
Windows Update MiniTool is a free and easy-to-manage program that helps you customize the Windows 10 update environment to your liking.
Windows Update MiniTool - a program for working with Windows updates
This utility looks for the latest updates, can remove old ones, reinstall upgrades, and much more. This software product also allows you to refuse updates.
Revo Uninstaller is a powerful program similar to the Windows Add or Remove Programs service.
Revo Uninstaller - a program for working with software and OS updates
This is a functional application manager that allows you to track how and when the operating system or any individual application was updated. Among the advantages is the ability to remove updates and applications in a list, rather than one at a time, which significantly reduces the time it takes to clean your device. The disadvantages include the complex interface and the general list for programs and updates, which is divided in the Windows service.
Why is the update not uninstalled?
An update cannot be uninstalled only because of an error or a series of errors that occurred during installation or operation of the patch update. The Windows system is not ideal: every now and then problems arise due to the load on the OS, inaccuracies in the network, viruses, and hardware failures. Thus, critical errors when installing an update may be located in the registry in which the update data is recorded, or in the hard drive sector where the update files are stored.
How to remove uninstallable updates
There are no standard methods for removing the “unremovable”. The occurrence of such a situation means that your device has critical errors that interfere with the correct operation of the operating system. It is necessary to take a whole range of measures to solve this problem:
- check your computer for viruses with several defender programs;
- carry out comprehensive diagnostics of the hard drive using specialized programs;
- run the registry cleaning utility;
- defragment hard drives;
- run the Windows repair service from the installation disc.
If all these measures do not lead to the desired result, contact a specialist or reinstall the operating system. The last measure, albeit drastic, will definitely solve the problem.
Updating the system is not scary. However, to maintain your computer's performance, you must ensure that all updates are installed promptly and correctly.
Every user of this operating system is familiar with periodic updates to Windows 10. Their main feature is surprise. Their downloading can begin at any moment without any warning. This usually manifests itself in active work.
Over time, the space on the system drive C is becoming less and less, and many users do not understand where it goes because they do not upload anything there.
Update files are one of the biggest eaters of free space on the system disk. Often their volume exceeds several gigabytes.
In this article we will talk about another one on the C drive in Windows 10, which involves deleting update files.
Features of storing update files in Windows 10
So that you understand what kind of files these are, we will briefly describe the update process to you. First, a special service responsible for checking for updates sends a request to the server. If they are available, then these files are downloaded to your computer. And not somewhere, namely to drive C.
After downloading them, they will be installed. It usually occurs when the computer is turned off.
After the updates are installed, Windows for some reason does not delete the downloaded files with the update sources and they eat up more and more space on drive C. These are what we will delete.
How to delete?
Many people try to find these files manually somewhere in the system folders. But fortunately, Microsoft has provided a special tool to free up space on drive C. It includes the option to safely delete Windows update files. That's what we'll use.
To do this, open the notification area through the icon in the lower right corner of the screen and in the menu that opens, click “All settings”.

Go to system settings
Now on the right click on “Free up space now”.

System Settings -> Free up space
This will start scanning the occupied space for files that can be safely deleted. As a result, a window similar to this will be displayed.
- The computer reboots itself - we understand the reasons Why the computer constantly reboots itself, what to do
- How to find out the owner by card number How to find the owner by card number
- Megafon TV service - How to watch your favorite channels on all devices
- Cheat codes for GTA San Andreas: Grand Theft Auto on PC
- Codes for "GTA: White City" for weapons and other content features
- Download the Blizzard App
- Standard sight for CSS V34