Blog of Dmitry Evtifeev. Background for product photography Background for product photography

 Live Journal
 Facebook
 Twitter
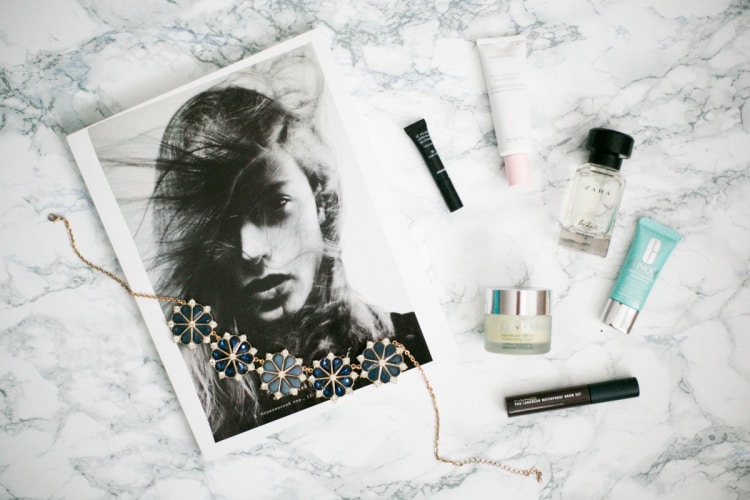
If you are interested in product or food photography, or like to shoot still lifes, then you know that one of the components of a good photo is a suitable background. By repeating from shot to shot, the background can become part of the photographer's recognizable style.
For photography, both light and uniform surfaces and textured ones are used: vintage wooden tables, various fabrics, as well as surfaces made of real or artificial marble, brick and even asphalt are used.
How to find a good background? It’s good if you already have a “textured” table in your apartment or studio (however, it’s still not very easy or pleasant to wipe off the consequences of a busy food shoot). Photographers often use real or specially made pieces of various materials, but all this wealth needs to be stored somewhere and is very inconvenient to transport.
Read the instructions on how to make a photo backdrop with your own hands at minimal cost. Such backgrounds are almost weightless, easy to move and (most importantly) very easy to clean.
Method 1. Photo printing on foam board
Printing on foam board is widely used in photography. Such prints are often hung on the wall - they are inexpensive, yet bright, light and durable. What if we use this technology for our task?
1. Find the source. There are no restrictions on what kind of image you can use for printing: a plaster wall, old wallpaper, painted old shabby chic boards, a brick wall, marble... You just need to take a photo of the surface you like or find it on one of the stock sites. Make sure the image resolution is at least 250-300 dpi.
2. Where to print. You can easily find a photo center, darkroom or printing company that offers printing services on foam board - choose the one that suits the price.
3. Select options. The thickness of the foam board must be at least 5 mm. Choose a matte print (a glossy surface will give unnecessary glare and reflections, which is not at all suitable for our purpose). Choose the appropriate size according to your taste. From experience, a size of 50x70 cm is well suited as a surface for laying out objects, and 100x120 cm can be used as a backdrop (wall).
4. Evaluate the result. Photo backdrops made in this way most often turn out really successful. Still, some prints may look unnatural. Don't be upset - just turn them over to the other side. Since the reverse is white, they can be used very effectively as reflectors. Another option is to imitate the surface of a window sill. Perfect if yours is not white enough, is still stone (hello, USSR) or is simply always filled with very necessary things.
So, it's worth a try. Be prepared that not all prints will turn out perfect, but if you do, you'll get a durable, feather-light, and easy-to-use photo backdrop.

Method 2. Vinyl wallpaper/backgrounds
They are available in all possible colors and textures, from wood to granite - you just need to look hard in the wallpaper section of the building supermarket. The print is made on a vinyl sheet that can be easily rolled up and placed in a corner/carried away. Of course, before using such wallpaper as a background for photography, the edges need to be pressed with something, or even better, glued so that the roll does not curl.

You can also buy special vinyl photo backdrops. Companies like Swankyprints ship them all over the world. But be prepared for the fact that the quality may vary. Some have flawless printing, others not so much, and you will only find out which one you got once you unpack your parcel. And the delivery price is steep, it’s better to order several at once. In Russia there are also online stores of vinyl photophones. It may be easier and cheaper to choose their products.
Method 3. Self-adhesive film
If you are not too lazy to work with your hands, then you can create a stylish background for literally pennies. You will need the same foam board and self-adhesive film. The film is sold in construction supermarkets (here is an example of a “marble” coating for 127 rubles), and foam board is sold in stores for artists (it costs 204 rubles).
Materials:
- self-adhesive film;
- bookbinding cardboard;
- dry clean rag;
- ruler;
- pencil;
- stationery knife.

Step 1. Draw a shape of the required size on cardboard. Draw a shape of the same size on the film. Using a utility knife, cut out the shapes using a ruler.

Step 2. Separate the protective film layer from the paper. Carefully apply the decorative pattern of the film with the adhesive side to the base and press with your palm. With one hand, continue to remove the paper from the film, and with the other hand, smooth the design using a clean, dry rag.
Step 3. After gluing, check whether bubbles have formed on the surface. If the film is glued unevenly or wrinkles appear, it can be quickly re-glued. But after an hour it will be impossible to separate the film from the base.
That's all
The stylish surface is ready for your photo experiments. Share in the comments which method you liked best or suggest your own option.
In this section, my current and potential clients can choose a background for their products. There are many backgrounds and not all are presented. Nevertheless, I tried to show here the most valuable and interesting ones.
If you are my fellow photographer, you can order a shield from me from any presented parquet for your subject photography. If you want, then for an apartment, I don’t mind :)
wooden parquet background. very beautiful tree drawing
Suitable for various luxury items

light bamboo parquet.
Good for dark subjects, various foods and still lifes.

Parquet with a red tint.

brown bamboo parquet
Good for dark subjects, various foods and still lifes. But darker than its fellow light bamboo (natural). This one is called "coffee".

Gray background
Universal background. You can shoot dark, light and color...

color accent on the background
This type of background is obtained solely due to lighting equipment.

Shooting on white with shadows. Essentially shooting on light gray.

Shooting in absolute white, without shadows. Convenient for websites and 3d-photo (3d-photo).
Many novice photographers think that to practice product photography, they need a bunch of complex and expensive equipment: generator light, a set of which can cost as much as a good car, your own studio, various accessories.
In fact, the main thing you need to know is the principles of working with light. And the main postulate is this: the way we see and perceive an object is determined by the light reflected from it. That is, in order to get a good photograph of an object, you need to correctly form reflections in it. Moreover, this is true for all types of surfaces - glossy, matte and combined.
The second fundamental postulate: the angle of incidence is equal to the angle of reflection. That is, if you are photographing an object with a complex surface and do not know where to put the light in order to get a certain highlight, direct a narrow beam of light from the camera to this place of the object (the focused light of a flashlight or laser pointer). The reflected light will show you where to place the light source.
As you can see, everything is quite simple, you just need to be able to apply this knowledge in practice.
Now I'll show you a few ways to photograph subjects that don't require expensive equipment.
Shooting on a black background.


As a result, light enters from the left, right and above, which produces glare on the subject. By adjusting the distance between the object and the flag, we can adjust the width of the highlights. You can also move the flag itself and the object to the sides to get highlights of different widths at the edges.
On the left there is a reflector measuring 1x1 m. This reflector allows you to get a stretched gradient on the left on an object or a large highlight on glass.
The camera, of course, needs to be mounted on a tripod. I won’t talk about the selection of shooting parameters, since I don’t want to repeat the same thing a thousand times. If you have any difficulties, study the articles and lessons on the site, as there should be an understanding, and not a stupid copying of camera settings and light schemes.
Shooting on a white background.
The principle of shooting on a white background is simple. - the background should be brighter than the object. Moreover, so much so that with a normally exposed object, the background turns out to be pure white or very close to pure white (so as not to lose the edges of the object).
An overly bright background is also bad. The edges of the object will begin to fade and disappear.
One of the schemes I use

Do not use whatman paper or paper instead of acrylic! When exposed to light, they give a very poor, uneven texture. If it is not possible to purchase milk plastic, you can use another material - Backlite printing film. It can be purchased from companies that sell materials for advertising printing. This film provides very good light scattering.
The circuit turns out to be somewhat more complicated, but you can use any devices, even table lamps, as sources. It is only important that their color temperature is the same.
I used a white foam ceiling tile as a reflector and cut a hole in it for the lens.
The result is like this

I would also like to remind you that lighting schemes are not recipes for all occasions. You must, first of all, proceed from what subject you are photographing and why.
And about the equipment. High-quality, expensive equipment undoubtedly provides enormous opportunities for fine control of light. The sources have very stable characteristics, for example, color temperature. Auxiliary equipment, such as object tables, cones, diffusers, do not introduce any extraneous color into the lighting. All this helps you to do the shooting itself, and not search for some solutions. But if the photographer does not know how to work with light, no equipment will help. Conversely, a photographer who knows and can put into practice the principles of working with light will take a good photo with almost any budget equipment. True, it will take much longer.
Photographs of objects taken on a white background are in demand by catalog compilers and various online stores. Also, similar photographs are used in advertising and magazines. Such photos are readily accepted into stocks, so there is a real opportunity to make money from this.
Everything you need for product photography on a white background:
- Regular plexiglass
- White Whatman paper
- Scotch tape or any sticky tape
- Lamp
Step 1: Create the background
First of all, you need to place two tables or any other securely standing surfaces next to each other in order to place plexiglass between them. It is advisable to leave free space around the tables so that it is convenient to adjust the composition and work with the camera. Background lighting is installed under the glass between the tables. The light should be soft. It should be pointed upward.

Now you need to attach a sheet of white paper to the background. Be sure to use a large sheet of paper so as not to create a seam. You should not use paper that is too thick. It must let light through. You can secure the sheet of paper with adhesive tape.

Now you can turn on the lighting from below and see how the whole structure works. If the lamp is turned on through an adjustable resistance, these are sold in the form of switches for adjusting the brightness of lamps in domestic premises, then the brightness of the backlight can be adjusted.
Step 2. Install the light source from above
In addition to lower background lighting, you also need overhead lighting.
To immediately set up the light correctly, you need to take the object that we will photograph and set it on the background. Next, set up the camera on a tripod and frame the photo. Place the light source on top. We adjust the brightness and position of the top lighting so that the shadows emphasize the shape of the object and do not stand out from the overall concept.

It is important that deep shadows do not appear on objects. Transitions of light and shadow should be smooth. There should be no blackouts or overexposure with loss of detail. Using a light source with adjustable brightness, you can easily achieve good results. When using a regular lamp without adjusting the brightness, you can adjust it further and closer to the subject. Also, to reduce the intensity of the light flux and disperse the rays, you can use a sheet of paper in front of the lamp. You will get a homemade softbox.

Step 3: Adjust Exposure and White Balance
In order to work less with pictures in a graphics editor, it is better to adjust the white balance right away. This will make the work much easier. To do this, it is best to use manual white balance adjustment using a gray card. It will be more difficult with the exposure settings, however, it is enough to take a few test shots in manual mode and make adjustments.
Step 4. What to check before shooting?
After taking a few test shots and adjusting the exposure and white balance, you need to make sure that the background illumination is even. The edges should not turn gray. There should be no shadow from the subject on the background. If you have to take at least a hundred photos, you should set everything up correctly right away, otherwise the process of processing images can become incredibly tedious.
Step 5. Correcting the photo in Photoshop
It is advisable to process each photo to create ideal contrast and color. Also sometimes you have to increase the sharpness. The first thing to do is check using the " Color standard» (Color Sampler) uniformity of the white background. Take measurements in different areas of the background across the entire background area. Everywhere should be white.

For white color, all R, G, B indicators must be at 255.

Next you need to work on the adjustment layer " Levels"(Levels). The histogram will show the distribution of tones in the photo. We will have many gaps in white in the background and perhaps no black. To bring the image to normal contrast, move the left slider to the beginning of the histogram. You can also move the right slider slightly. In general, you need to be guided by how the photo looks.

The central slider adjusts the overall brightness, so you can adjust this parameter as you wish. It is advisable to slightly increase the sharpness in all photographs. The best filter for this is “ Smart Sharpen"(Smart Sharpen). The values of this filter are selected individually for images.

Conclusion
All actions taken can be recorded in an action and used in batch processing. This will significantly speed up photo correction. High-quality photographs taken and processed are very suitable for stock photography, so photographing objects on a white background is not only a complex and exciting activity, but also an opportunity to make money from your hobby.
The carpet and the festive table have not appeared in photographs from events for a long time, which is very pleasing. Their places were taken by beautiful thematic backgrounds and zones, selected dresses and suits, and high-quality photographs processed by professionals at the exit. And products have long been photographed using special devices - light boxes or backdrop systems for product photography.
All this can be rented from photo studios or from photographers, or you can do it yourself, spending a little effort, time and materials. The main criterion for selecting a background is the purpose - for a wedding and for product photography you need to use different equipment.
Background for a home photo shoot
You can make a home photo studio for a portrait or family photo shoot and the backgrounds for it yourself, using a free wall or any frame made of wood or metal. The peculiarity of filming a house is the presence of walls and the frequency of filming. For a holiday or important event, it is not necessary to construct a capital base for the background.
To attach the background, you can use ordinary paper clips and a vertical surface, a rope firmly stretched between two walls, a curtain rod in the bathroom, ordinary baguettes or a curtain rod attached to the wall, and any other device.
The main condition is that the background must be stretched, then it will look harmonious in the photo. Absolutely any material is used, as the photographer intended - a colored or plain background, an image or a thematic landscape. You can complement the image with accessories, pieces of furniture or attributes to fill the picture and create volume.

What dimensions should a background have for home use? If you plan to shoot a subject, then the volumes should be based on the size of the object; if you are shooting a child - height from 1.5 meters, width from 1 meter, the larger, the further the photographer can move away.
Again, a newborn child and a 14-year-old child require different amounts of space, this must also be taken into account. For an adult, the height of the background will be from 2 meters, and the width – from 1.5 meters.
In home photography, backdrops are required to celebrate a birthday or wedding anniversary at home or in a cafe. For the last 3-4 years, it has been popular to have a photo wall or photo area at a party that attracts the attention of guests and allows you to take memorable photos. It is necessary to take into account the number of guests in the frame at the same time - for 5-7 people, the width of the background will already be 3 meters and the structure will need to be stronger and more stable.

Background for a wedding photo shoot
On their most important day, a young family tries to take the maximum number of memorable photographs and beautiful holiday pictures. To do this, many people order photo walls or photo corners, where various accessories, paraphernalia and a background hang.
Popular themes are a wall with cut-out frames, a floral theme, the names of the newlyweds and the wedding date. Such a background is already heavier than a home one and requires more careful preparation. Typically, a wooden or metal structure is used, which is assembled and disassembled directly on the day of the holiday; fabric, film or paper with an image is attached to it.

You can also make a backdrop for a wedding photo shoot with your own hands from dug-in poles with a stretched rope or cable for tension. All this is decorated with flowers, ribbons, balloons, funny or beautiful pictures and creates the atmosphere of the evening.
Guests can take photos in the area. Since the wedding option involves photographing adults, it is better if it is 3 meters wide and 2 – 2.5 meters high.
Background for product photography
Another option, fundamentally different from the first two, is a homemade background for product photography. What it is used for – photography of goods, jewelry, home-made toys, photography of items for sale online. Its size directly depends on the object - for jewelry 50 x 50 cm is enough, for goods you may need 1 meter by 1 meter or more.
The peculiarity of shooting in the position of the subject and the camera is that the product lies on the background, and the light and lens are on top.

To create a background, you can use wood, paper, plastic, drywall, fabric and other materials that create the desired texture. They are decorated, painted and created the desired color and look for specific shoots or objects. All these materials are easy to process and do not require special skills. This type of design does not require fastening and can be moved to the desired location.
Another option is to create a background for the house from a section of wall or interior items. There are a lot of options - decorate the desired place, hang it with fabric or paper, or simply put the elements on the sofa or table. If filming is required frequently, then it makes sense to find a place in the house with the right light and equip a constant background there.
Portable backgrounds, on stands
The most convenient option for on-site photography is photophones on special gates. They are assembled and disassembled in a couple of minutes and consist of a metal frame on stands on which a background is attached - fabric, banner, paper. Background gates are an indispensable thing in a photographer’s arsenal; with their help, you can create a photo zone anywhere.
They are offered in different sizes, height from 2 to 4.5 meters, and width from 2 meters, optimally 3.8 - 4.1 m.
They are adjustable and can be adjusted to different sizes, they are stable, easy to assemble and light in weight. The “gate” type background mounting system is an excellent option for both home filming and outdoor trips, and it can also be used for subject photography.
In addition to the “gate”, you will need fasteners for the background - ties, wire, clamps. They are also necessary for tensioning the material, especially if fabric is used, because it tends to show kinks and shadows in photographs.
Background installation system
A more complex and expensive mechanism for photo shoots is the background installation system. It is a hanging system of gear brackets on which material is attached - fabric, film or paper.
The rollers with backgrounds can be set in motion manually, according to the principle of blinds, or automatically, using a motor and remote control. Up to 6 backgrounds can be installed on the system at the same time; they are in a twisted state; if necessary, the desired one is lowered. The width of the entire structure is from 2 meters, rolls with backgrounds can be replaced.

The cost of such a system is much higher than other options, it needs to be mounted on the wall, and paper backgrounds are quickly consumed because the bottom part gets dirty. Therefore, it is advisable to take it only if necessary - for a studio or photo studio.
DIY photophone on the wall
One of the simplest decor options that does not require a structure and depends only on your image is a photo wall. Decor is applied directly to a section of the wall; you can use primer, textured plaster, paint, tiles, plasterboard elements, stickers and much more. You can paint the wall with drawings, cover it with paper flowers or balloons, hang pictures or ribbons, attach letters or numbers, or drape it with fabric. This design option is suitable for a holiday or meeting guests; this principle is used to create a candy-bar - a table with treats.
DIY light box
Light-box is a special box for product photography that you can make yourself. The main idea of a light box is the absence of shadows from the object, due to the dispersion of the supplied light. The design is simple, to create it you will need:
- The base, for example, is a cardboard box of the required size. Everything unnecessary is cut off from it, the side walls are cut through to allow light to enter;
A piece of white paper, what paper is ideal. It should cover the back wall and flow smoothly without an angle to the bottom of the box.

- Scotch tape or pushpins are needed to secure all the elements to the box.
tracing paper is a translucent or white fabric with which the top and side slits are draped so that the light coming from the sources is scattered as much as possible;Light sources, the shade and power you need;
Actually, a camera that needs to be set up for subject photography and check the white balance using Whatman paper before starting.
Cyclorama - background for DIY photography
A cyclorama is essentially the same light box, but larger in size. This is a background of walls and floors without corners, which creates the impression of endless space. It can be white, black, blue or green, and is used for catalog and advertising photography, for photo and video filming of people, objects, cars.

In a home photo studio, a light-box will be enough for infrequent use, but for studio photography, a cyclorama is necessary. You can create it with your own hands using the same materials, you just need to correctly calculate the corners and transitions so that the boundary between the floor and the wall is not visible.
Interior items and improvised means for creating a photo backdrop
The greatest scope for imagination is provided by the use of any available means for photography. Interior items, furniture, mirrors, household appliances, fences, doors, trees and any other objects can be used as a background. They can be decorated with decorative elements, painted and supplemented with any details.
Weddings in rustic style against the backdrop of trees, photographing pregnant women in fabric huts in the forest, children's birthday parties and filming in the courtyard, in paper balloons and ribbons and many other ideas and options. They usually do not require fastening; the most that needs to be done is to hang the swing on a branch or arrange elements, throw fabric or toys. This type of background is gaining popularity, many people take cameras and beautiful objects and go out to shoot.

Materials suitable for creating photo backdrops
Regardless of the type of fastening or its purpose, each photophone must have certain qualities: strength, ease of fastening, relative dust and dirt resistance. An important factor is the price of the background. Most often used:
- Fabric bases for the background or fabric with a printed pattern, plain fabric, the choice depends on the idea. It is durable, can be ironed, is easy to transport, easy to mount and looks very beautiful in photographs, as it does not reflect light, but scatters it.
The downside of the fabric is the need to tension it if the kinks and irregularities are not intended by the plot. This is a fairly expensive backdrop option, suitable for mounting in any way - on the wall with buttons, on the “gate” with ties, in rolls on a backdrop lifting system. Specialized stores offer a wide selection of fabric photo backdrops with various thematic designs and compositions.
.gif)
Paper backgrounds
Budget material, great for rare shooting or home use. You can make it yourself from whatman paper or rolled wallpaper. Photography stores offer a huge selection of designs for such backgrounds; they can be plain, multi-colored, textured, with thematic images, landscapes and panoramas. The paper is light, easy to store, transport and install, but not strong enough and easily soiled. If the background is also placed on the floor, then it is practically disposable, because marks and stains on the photograph will be very noticeable.

Spunbond

Plastic
- Often used as a basis for creating a background. It is durable, dense and holds heavy decorative elements well. This material is sold by the meter in plates, has a thickness from 1 mm to 7 mm and different densities, respectively. To secure it, you will need a base made of wood or metal, since ordinary paper clips or ties will not hold it.
Banner film
This is a familiar advertising material that is used on the streets. You can print almost anything on it and use it in any weather and outdoor conditions, which other materials cannot do. Banner film requires an installation frame or a banner made of metal or wood, is quickly and easily stretched and looks great in photographs.

Before choosing a background for your photo shoot, you should decide on the theme, shooting conditions, attributes and decor and choose the material according to your idea. Is it possible to attach this or that material, can it be used for decoration, will the background withstand wind, rain or a large number of guests and other points. There are numerous companies that rent or make custom photo walls and backdrops for holidays; you can order them to create a photo zone. Or make it yourself according to your own idea.
- Taking beautiful photos with a regular camera
- The best examples of product advertising How to make advertising interesting
- Taking Better Black and White Photos - Basic Tips and Examples Cameras for Black and White Photography
- How to shoot a foggy landscape?
- What is a monopod and for what purpose is it intended?
- Taking black and white photos with a digital camera Basics of black and white photography camera settings
- Background for product photography Background for product photography